The Complete Guide to JSON Web Token (JWT) Claims
An examination of JWT claims including registered and custom types, covering best practices and token validation for advanced developers.
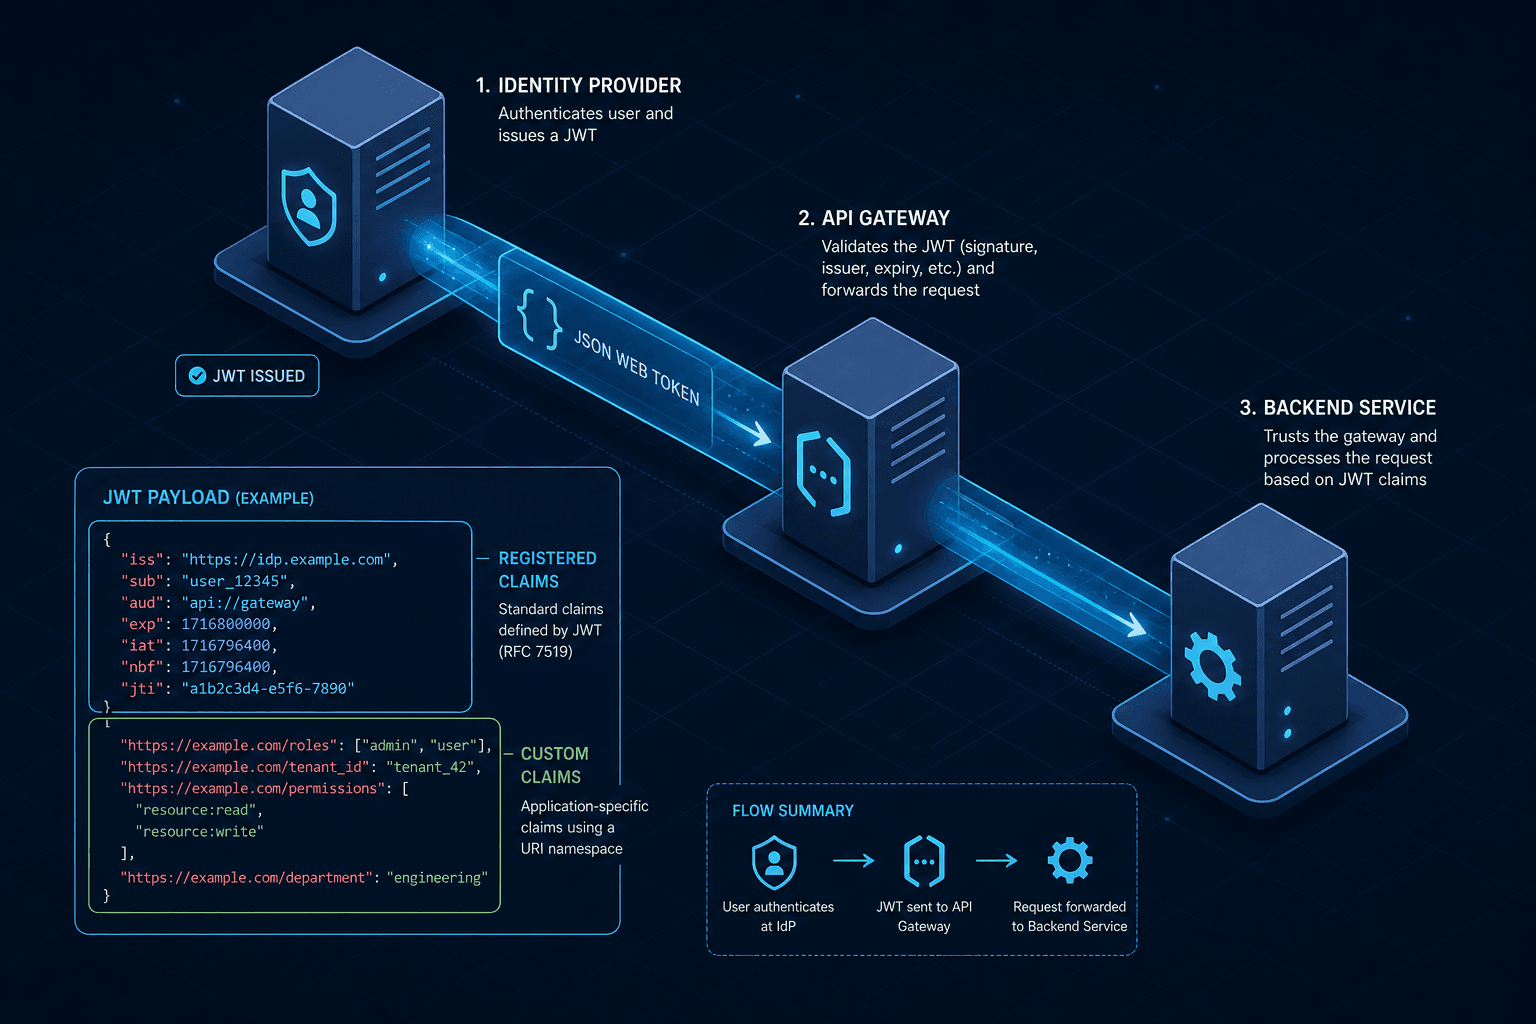
The JSON Web Token (JWT) specification (RFC 7519) defines a compact, self-contained mechanism for securely transmitting information between parties as a JSON object. However, treating the payload as a generic bag of data is a fundamental misunderstanding of the protocol's architecture. The payload is not merely a container; it is the executable definition of the session's scope, validity, and identity. When inspecting a JWT, one is inspecting the set of rules that the receiving service must enforce before granting access. The distinction between "registered" claims, which have standardized meanings defined by the RFC, and "custom" claims, which carry domain-specific logic, determines whether an authentication system functions as a rigid wall or a permeable sieve.
The Registered Claims: The Mechanism of Trust
The JWT standard defines seven "registered" claims. These are not optional suggestions; they are the mechanism by which the token proves its own legitimacy. They are identified by their short names (keys) in the JSON object.
Consider a scenario where Alice logs in. The Identity Provider (IdP) generates a token. The IdP must populate specific registered claims to ensure the Resource Server (RS) can process it correctly.
iss(Issuer): This identifies the principal that issued the JWT. Mechanically, the RS uses this to select the correct public key for verification. If a token claimsiss: "auth.example.com"but the RS only trusts keys fromauth.prod.example.com, the token is rejected immediately.sub(Subject): This identifies the principal that is the subject of the JWT. Unlikeiss,subis opaque to the verification logic; it is merely a string. It usually contains a user ID (e.g.,12345). The RS maps this ID to its internal database.aud(Audience): This identifies the recipient(s) for whom the JWT is intended. This is the primary defense against token replay attacks across different services. If a token issued for thebilling-serviceis presented to thedashboard-service, theaudcheck fails.exp(Expiration Time): This defines the time (in seconds since epoch) after which the JWT must not be accepted for processing. The mechanism here is a simple comparison:current_time > exp. If true, the token is invalid.nbf(Not Before): This defines the time before which the JWT must not be accepted. This is useful for pre-issued tokens.iat(Issued At): This indicates the time at which the JWT was issued. It allows the RS to calculate token age, which is crucial for rotation policies.jti(JWT ID): This provides a unique identifier for the JWT. While optional, it is the mechanism for implementing revocation in a stateless system.
Let's look at a concrete token payload generated by an IdP:
{
  "iss": "https://auth.example.com",
  "sub": "user-8821",
  "aud": "https://api.example.com",
  "exp": 1678901234,
  "iat": 1678897634,
  "nbf": 1678897634,
  "jti": "e3f2a1b9-4c5d-6e7f-8a9b-0c1d2e3f4a5b"
}
Notice the exp value. If the current time on the server is 1678901235, the token is expired. The validation logic does not care about the content of the sub or any custom claims; if exp fails, the entire cryptographic signature verification is bypassed because the token is considered structurally invalid. Conversely, if the exp claim is missing, strict validators treat this as an error, rendering the token invalid. A token that is technically valid forever is only a consequence of lax implementations that skip the check, not a protocol feature.
Namespace Management: Registered vs. Custom
The JWT standard explicitly categorizes claim names into three namespaces: Registered, Public, and Private. Confusion often arises here. Registered claims are reserved by the IANA registry and are defined by the JWT specification itself. Public claims are registered with IANA but are not defined by the JWT spec itself. Private claims are intended for use within a closed system.
The critical mechanism here is collision avoidance. If you define a custom claim simply as role, and a future version of the JWT standard reserves role for a new purpose, your application will break. Worse, if you use admin as a boolean flag in your custom claims, and a malicious actor modifies the token to set "admin": true, you have a vulnerability if your application treats this as a registered claim.
The standard recommends using a URI namespace for custom claims to guarantee uniqueness. This is not just a naming convention; it is a scoping mechanism.
{
  "iss": "https://auth.example.com",
  "sub": "user-8821",
  "https://example.com/claims/permissions": ["read", "write"],
  "https://example.com/claims/dept_id": "engineering"
}
By prefixing with a fully qualified domain name, you ensure that even if another application defines permissions as a standard claim, your application will never accidentally read the wrong value. This approach is a cornerstone of JWT security when managing complex authorization logic.
The Validation Mechanism: A Worked Scenario
To understand how claims drive authorization, let's trace the flow of a request from a client to a protected API.
Actors:
- Client: Holds the JWT.
- API Gateway: The entry point that validates the token signature and basic claims.
- Service A: The backend logic.
Scenario: The Client sends a request to /api/orders with a JWT.
- Signature Verification: The Gateway extracts the
algheader and uses thekid(Key ID) to fetch the public key. It verifies the HMAC or RSA signature. If this fails, the process stops. Opinion: Never skip this step even if you trust the source network. The client typically transmits this via theAuthorization: Bearer <token>header. - Claim Extraction: The Gateway parses the payload.
- Registered Claim Validation:
- Check
iss: Is ithttps://auth.example.com? If no, reject. - Check
aud: Does the token containhttps://api.example.com? If no, reject. - Check
exp: Isnow < exp? If no, reject. - Check
nbf: Isnow >= nbf? If no, reject.
- Check
- Custom Claim Forwarding: The Gateway forwards the validated payload to Service A. Service A consumes the claims from the payload, specifically reading
https://example.com/claims/permissions. - Authorization Decision: Service A checks if
permissionscontainscreate_order.
If the aud claim is missing, the token could have been issued for a different service entirely. If the iss claim is missing, the Gateway cannot know which key to use. If the exp claim is missing, strict validators reject the token immediately to prevent infinite validity, though lax implementations might allow it to persist indefinitely, creating a massive security risk.
A common failure mode occurs when developers rely on custom claims for critical security logic without validating the registered claims first. For example, if a developer adds a custom claim isAdmin: true and relies on it for access control, but fails to validate the iss or aud, an attacker could generate a token with isAdmin: true using a known public key from a non-trusted issuer, bypassing the entire authentication flow.
Best Practices and Pitfalls
The most persistent anti-pattern in JWT usage is storing sensitive data in the payload. The JWT payload is base64url-encoded, not encrypted. Anyone can decode it.
1. Avoid Storing Sensitive Data
Never store PII or secrets in the token.
// BAD: Storing PII
{
  "sub": "user-8821",
  "email": "user@example.com",
  "credit_card_last_four": "1234"
}
If an attacker intercepts the token (e.g., via XSS or a proxy log), they immediately have access to this data. The mechanism of JWT is to transmit authorization, not data. If you need to send PII, fetch it from the database using the sub or jti from the token.
2. Monitor Token Size
Every claim adds bytes to the header. In HTTP, headers are limited in size by servers and proxies, though the specific limit varies by server configuration (e.g., Nginx defaults often cap headers around 8KB). If you add too many custom claims, the request may fail with a 400 Bad Request or 413 Payload Too Large.
3. Implement Revocation via jti
Consider the jti claim. While JWTs are stateless, sometimes you need to revoke a token (e.g., a user changes their password). Since the token cannot be "deleted" from the client's device, you must maintain a blacklist. The jti provides the unique key for this blacklist.
Redis Key: revoked_tokens:{jti_value}
TTL: {exp - current_time}
When a request arrives, the system checks if the jti exists in the blacklist before validating the signature. This is the only reliable way to handle immediate revocation in a stateless architecture.
Practical Takeaways
- Trust Boundaries: Treat registered claims (
iss,aud,exp) as the immutable boundaries of trust. Never override them with custom logic. - Namespace Safety: Always use a URI namespace for custom claims to prevent collisions with future standards or third-party libraries.
- Validation Order: Always validate registered claims (especially
expandiss) before processing any custom claims. If the structural integrity fails, stop immediately. - Stateless Revocation: If you need to revoke a token, use the
jticlaim with a short-lived cache (like Redis) rather than trying to invalidate the token cryptographically.
FAQ
Can I store passwords in a JWT?
No. The JWT payload is encoded, not encrypted. Storing passwords or sensitive PII in the token exposes this data to anyone who intercepts the token. Use the sub claim to identify the user and fetch sensitive data from your database on demand.
What happens if the exp claim is missing?
Strict validators will reject the token as invalid. A missing expiration claim means the token has no defined lifespan, which is a critical security flaw. Relying on a missing exp to allow a token to be valid forever is a consequence of poor implementation, not a feature of the standard.
How do I revoke a token?
Since JWTs are stateless, you cannot "delete" them. Instead, use the jti (JWT ID) claim to store a unique identifier in a short-lived cache (e.g., Redis) when revocation is required. During validation, check if the jti exists in the blacklist.
Conclusion
JWT claims are the logic layer of your authentication system. Registered claims provide the structural integrity and trust boundaries, while custom claims provide the application context. Treating them with the same rigor as the cryptographic signature ensures that your token validation is resilient, secure, and predictable.
Related posts
Building Identity-Aware Load Balancing with NGINX and Keycloak
Learn how to implement identity-aware load balancing using NGINX and Keycloak for secure authentication routing.
Understanding JWKS: Rotating Signing Keys Gracefully
An examination of JSON Web Key Set (JWKS) mechanisms for securely rotating signing keys and verifying JWTs without service interruption.
OAuth 2.0 vs JWT: Understanding the Relationship
An examination of the relationship between OAuth 2.0 and JSON Web Tokens, covering opaque tokens, token format selection, and JWT best practices.