Building Identity-Aware Load Balancing with NGINX and Keycloak
Learn how to implement identity-aware load balancing using NGINX and Keycloak for secure authentication routing.
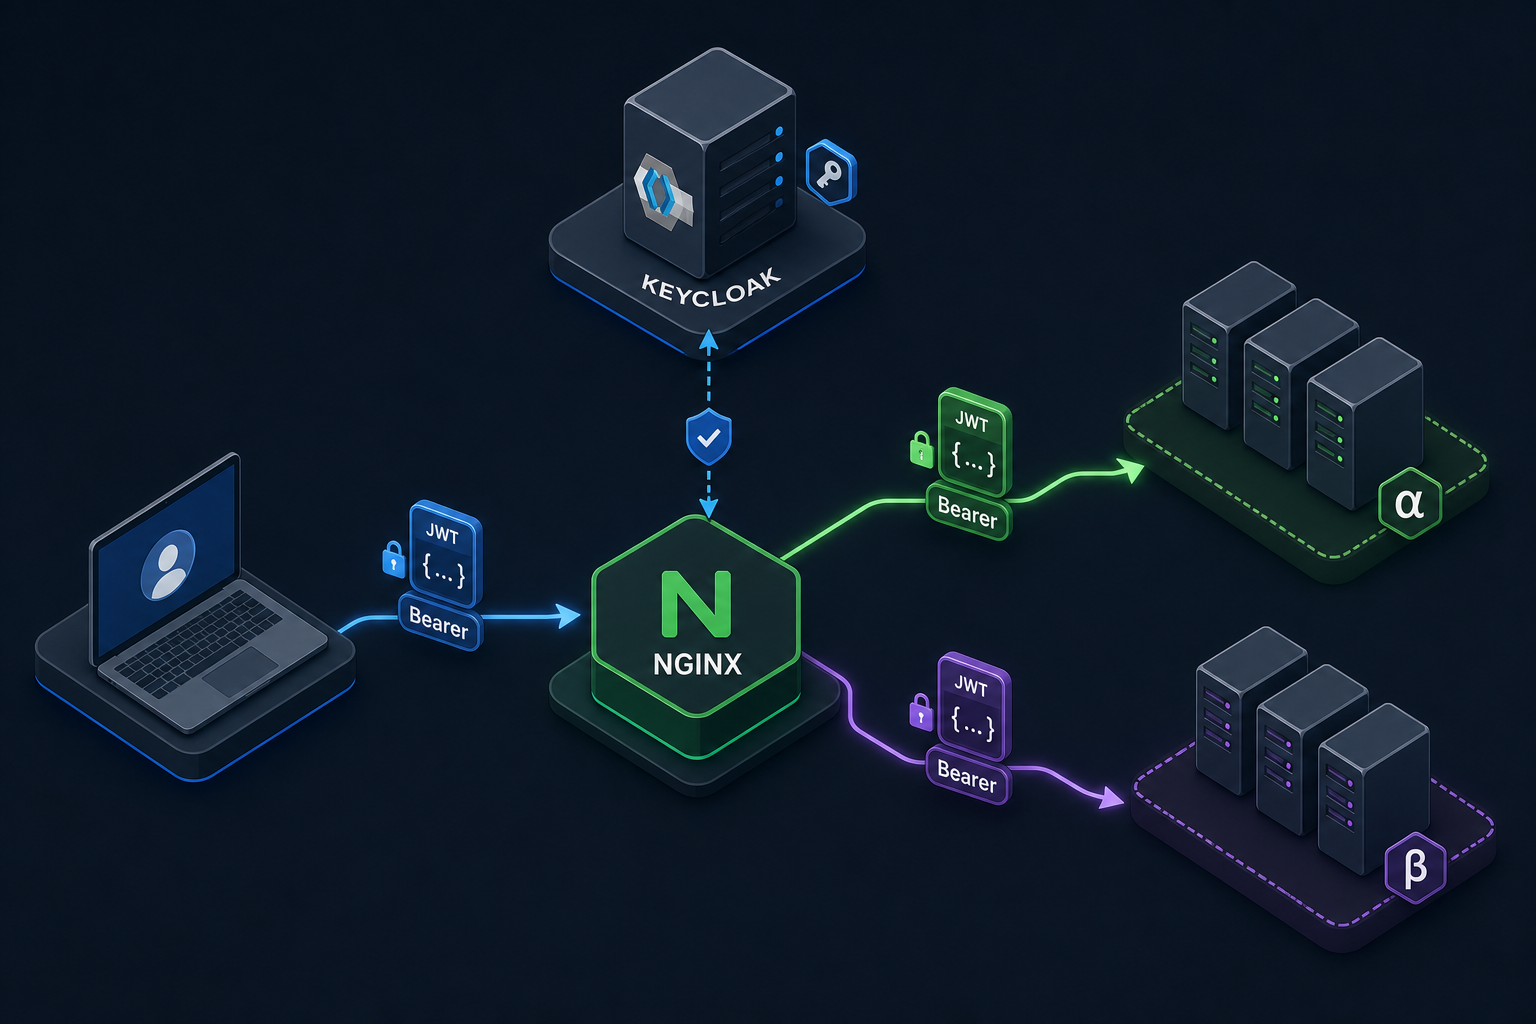
Standard load balancers distribute traffic based on network heuristics like least connections or round-robin. While effective for stateless APIs, this fails when applications require session affinity or role-based routing to specialized pools. We shift the decision point from static IP checks to dynamic JWT claim evaluation, moving logic to the application layer. NGINX acts as the gatekeeper parsing tokens, while Keycloak serves as the authoritative issuer of user attributes.
The core mechanism relies on the JSON Web Token (JWT) structure defined in RFC 7519. A JWT consists of a header, payload, and signature. The payload contains claims like sub, role, or tenant_id. When a user authenticates against Keycloak, they receive this token. The load balancer does not need to decrypt the cryptographically secured signature to read the payload; it only needs to base64-decode the middle section to extract routing data. However, to ensure integrity, the signature must still be verified locally using the public key before any routing logic executes.
The Trust Boundary: Keycloak Configuration
Before NGINX can make routing decisions, it must receive a token containing the necessary claims. Keycloak, acting as the Identity Provider (IdP), must be configured to include these claims in the access_token. By default, Keycloak might only return standard OIDC claims, which are often insufficient for granular routing. We must configure the client settings to include custom attributes or map specific realm attributes to the token payload.
In the Keycloak Admin Console, navigate to the client configuration. Under the "Advanced" tab, ensure "Access Token Lifespan" is appropriate for your load balancing session duration. More critically, under "Client Scopes," ensure the "Default Client Scopes" includes the profile or email scopes if you are routing by user attributes, or configure a custom mapper to inject a department claim into the access token.
{
  "clientId": "nginx-router-client",
  "standardFlowEnabled": true,
  "implicitFlowEnabled": false,
  "directAccessGrantsEnabled": false,
  "serviceAccountsEnabled": false,
  "publicClient": false,
  "protocol": "openid-connect",
  "attributes": {
    "post.logout.redirect.uris": "https://app.example.com/logout"
  }
}
When the user logs in, Keycloak issues a token. If the token is signed with an RS256 algorithm, the payload is readable by anyone, but the signature ensures it hasn't been tampered with. The critical piece for NGINX is the aud (audience) claim. If you have multiple backend services, the token must specify which service it is intended for, or NGINX must validate the token against a shared public key to ensure it originated from your Keycloak instance.
NGINX as the Routing Engine
NGINX receives the request with the Authorization: Bearer <jwt> header. A standard NGINX instance cannot natively parse JSON inside a header to extract a claim. You must introduce a scripting engine. The most robust method for enterprise-grade routing is using the ngx_http_lua_module, which is available in NGINX Plus (paid) or via OpenResty (a distribution). If using standard NGINX Open Source, this requires alternative modules like njs or the open-source lua-resty-nginx-module, not the Plus module.
The script performs three distinct steps: extraction, verification, and claim mapping. It isolates the JWT from the Authorization header, fetches the public key from Keycloak's JWKS (JSON Web Key Set) endpoint to verify the signature, and decodes the payload to read the target claim (e.g., tenant_id).
Consider a scenario where User "Alice" (tenant alpha) logs in. Keycloak issues a token with {"sub": "alice", "tenant_id": "alpha"}. Alice requests /api/data. NGINX intercepts this and executes the following logic:
-- Lua Script for NGINX (ngx_http_lua_module)
local cjson = require "cjson"
local jwt = require "resty.jwt"

function handler()
    -- 1. Extract Authorization Header
    local auth_header = ngx.req.get_headers()["Authorization"]

    if not auth_header then
        ngx.status = 401
        ngx.say("Missing Authorization header")
        return ngx.exit(401)
    end

    -- 2. Parse JWT (Assuming Bearer token)
    local jwt_obj = jwt:new()
    local token = string.match(auth_header, "Bearer (.+)")

    -- 3. Verify Signature against Keycloak Public Key
    -- In production, fetch key from JWKS dynamically or cache it
    local public_key = "-----BEGIN PUBLIC KEY-----\n..."
    local verified = jwt_obj:verify_jwt(token, public_key)

    if not verified.valid then
        ngx.status = 401
        ngx.say("Invalid Token")
        return ngx.exit(401)
    end

    -- 4. Extract Payload Claims
    local payload = verified.payload
    local tenant_id = payload.tenant_id

    if not tenant_id then
        ngx.status = 403
        ngx.say("Missing tenant_id claim")
        return ngx.exit(403)
    end

    -- 5. Set Upstream based on Claim
    -- This variable is used in the 'proxy_pass' directive later
    if tenant_id == "alpha" then
        ngx.var.upstream_tenant = "backend_alpha_pool"
    elseif tenant_id == "beta" then
        ngx.var.upstream_tenant = "backend_beta_pool"
    else
        ngx.var.upstream_tenant = "default_pool"
    end
end
This script runs synchronously. If the token verification fails, the request is dropped immediately, never reaching the backend. This is a security imperative; routing logic must never execute on unverified data.
Upstream Selection and Configuration
Once the Lua script sets the upstream_tenant variable, NGINX uses this to direct traffic. We define upstream blocks in the nginx.conf file that correspond to the different tenant pools. Crucially, the routing logic must occur in the access_by_lua_block phase to set the variable, as proxy_pass cannot be determined dynamically within a content_by_lua_block.
upstream backend_alpha_pool {
    server 192.168.1.10:8080;
    server 192.168.1.11:8080;
}

upstream backend_beta_pool {
    server 192.168.1.20:8080;
    server 192.168.1.21:8080;
}

upstream default_pool {
    server 192.168.1.30:8080;
}

server {
    listen 80;

    # Set the upstream variable during the access phase
    location /api {
        access_by_lua_block {
            handler()
        }

        # Route based on the variable set by the script
        proxy_pass http://$upstream_tenant;

        # Pass the original headers
        proxy_set_header Host $host;
        proxy_set_header X-Real-IP $remote_addr;
    }
}
This configuration creates a dynamic dependency chain: Request -> NGINX Header -> JWT Decode -> Claim Check -> Variable Set -> Upstream Selection. The backend servers themselves do not need to know about the routing logic; they simply receive the traffic destined for their specific pool.
Validation Strategy: Local vs. Remote
There is a critical design decision regarding how NGINX validates the token signature. You can either:
- Remote Introspection: NGINX sends the token to Keycloak's
/oauth2/token/introspectendpoint for every request. - Local Verification: NGINX fetches the public key from Keycloak's
/realms/{realm}/protocol/openid-connect/certsendpoint once (or caches it) and verifies the signature locally.
For high-throughput systems, local verification is superior. Remote introspection adds a network hop and a synchronous database query to Keycloak for every single request, creating a bottleneck that negates the benefits of load balancing. Local verification leverages the cryptographic properties of RSA/ECDSA signatures: if the signature matches the public key, the token is valid, and the claims have not been altered.
To implement local verification, the NGINX worker process must cache the JWKS (JSON Web Key Set). While fetching the key is a one-time operation, the signature verification itself is a synchronous CPU-bound operation that blocks the worker process. Therefore, libraries like lua-resty-jwt do not make the verification asynchronous by default; they handle fetching and caching the public keys automatically, ensuring that if Keycloak rotates keys, NGINX picks up the change without restarting, but the verification cost remains on the worker thread.
Common Pitfalls
Implementing identity-aware routing introduces specific risks that must be managed proactively. First, token expiration handling is critical. If a token expires mid-request or just before a backend call, NGINX must reject it immediately. Failing to check the exp claim can lead to unauthorized access if the token is reused, or unnecessary latency if the backend attempts to re-authenticate. Second, JWKS caching failures can cause system-wide outages. If the NGINX worker fails to fetch or cache the public key from Keycloak, all subsequent requests will fail verification. Implementing a fallback mechanism or alerting on cache misses is essential. Finally, incorrect claim mapping can route users to the wrong tenant. Ensure that the Keycloak mappers strictly match the expected values in the NGINX logic, and validate that claim names are case-sensitive and exact.
Practical Takeaways
- Separate Decoding from Verification: Remember that base64 decoding the payload is trivial, but cryptographic signature verification is a CPU-intensive operation that must be performed securely.
- Use Access Phase for Routing: Always set upstream variables in
access_by_lua_blockbefore theproxy_passdirective to ensure dynamic routing works correctly. - Cache JWKS Locally: Avoid remote introspection for high-volume traffic; cache public keys in NGINX to reduce latency and load on Keycloak.
- Validate Claims Strictly: Ensure that required claims like
tenant_idexist before allowing the request to proceed to prevent routing errors. - Choose the Right NGINX Flavor: Use NGINX Plus or OpenResty for native Lua support; standard Open Source requires alternative modules.
FAQ
Q: How should I handle JWT expiration in the load balancer?
A: NGINX should check the exp claim in the payload during the verification phase. If the current time exceeds the expiration time, the token is invalid, and NGINX should return a 401 Unauthorized immediately.
Q: What happens if Keycloak rotates its signing keys?
A: NGINX should periodically poll the JWKS endpoint to update the cached public keys. Libraries like lua-resty-jwt can automate this, but you must ensure the cache TTL is short enough to catch rotations quickly without overwhelming Keycloak.
Q: Can I use standard NGINX Open Source for this?
A: Yes, but you cannot use the native ngx_http_lua_module found in NGINX Plus. You must use OpenResty, which bundles the Lua module, or use the njs (NGINX JavaScript) module for similar functionality.
Q: Is it safe to trust the tenant_id claim blindly?
A: No. Always verify the token signature first. Once verified, you can trust the claims. However, ensure the claim values are whitelisted to prevent injection attacks or unexpected routing behavior.
Conclusion
Identity-aware load balancing transforms NGINX from a passive traffic distributor into an active security gateway. By leveraging the standard JWT mechanism, you offload the heavy lifting of authentication to Keycloak while retaining the performance of local signature verification in NGINX. The routing logic becomes a function of the user's identity, allowing for granular control over tenant isolation and role-based access at the infrastructure level. This architecture ensures that security policies are enforced at the edge, reducing the attack surface for downstream applications and providing a scalable foundation for multi-tenant environments.
Related posts
Multi-Factor Authentication with OIDC: Implementing MFA
An examination of implementing multi-factor authentication using OIDC, covering Keycloak, WebAuthn, TOTP, and step-up authentication via ACR.
Understanding JWKS: Rotating Signing Keys Gracefully
An examination of JSON Web Key Set (JWKS) mechanisms for securely rotating signing keys and verifying JWTs without service interruption.
Implementing WebAuthn in Keycloak: Passkey Authentication Setup
A walkthrough for configuring WebAuthn and passkeys within Keycloak to enable passwordless authentication using FIDO2 standards.