Keycloak Custom Authentication Flows: Building Custom Login Experiences
An examination of Keycloak authentication flows, custom auth strategies, and SPI implementation for building tailored login experiences.
The Mechanics of Custom Authentication in Keycloak
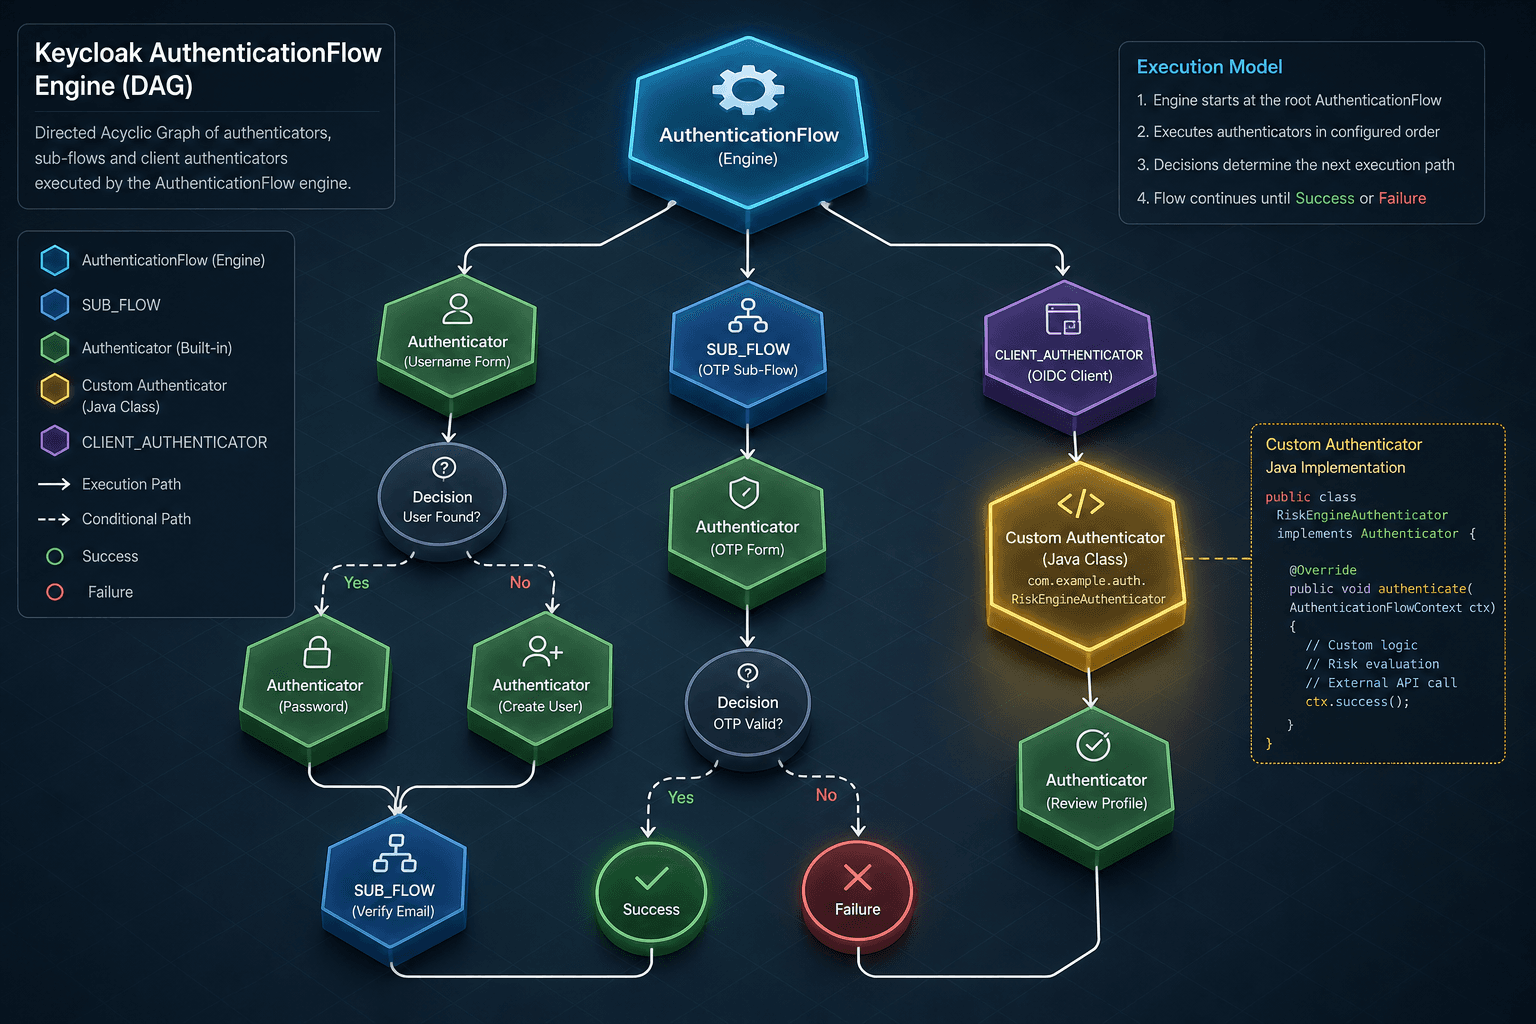
To build a custom login experience in Keycloak, you must abandon the assumption that the login page is a static HTML file waiting to be styled. Instead, view the login process as a directed acyclic graph of execution nodes managed by the AuthenticationFlow engine. When a user initiates a login, Keycloak does not simply "show a form"; it executes a sequence of Authenticator instances. Each instance acts as a gatekeeper, deciding whether to proceed to the next node, redirect the user, or mark the authentication as successful. The default flow is hard-coded in the auth table, but the power lies in modifying this graph at runtime or compiling a custom implementation to inject proprietary logic.
This article is Part 3 of the Keycloak Advanced Series.
The Execution Engine and Node Types
The core mechanism driving any login flow is the AuthenticationFlow. Within this flow, you define nodes of different types: SUB_FLOW, AUTHENTICATOR, or CLIENT_AUTHENTICATOR. When the engine hits an AUTHENTICATOR node, it invokes the authenticate method of the registered Authenticator implementation. This method receives an AuthenticationFlowContext object, which is your primary interface for manipulating the session state.
Consider a scenario where we need to implement a "Device Fingerprinting" step before asking for a password. In the default flow, this step does not exist. We must insert a custom node. If the custom authenticator decides the device is suspicious, it calls context.failureChallenge(...), which halts the flow and redirects the user back to the login form with an error message. If the device is trusted, it calls context.success(), marking the current authenticator as successful. However, to bypass the subsequent password prompt, the flow configuration must explicitly skip the next node, or the authenticator must handle user identification completely within its logic. This mechanism allows for granular control over the user journey that CSS or simple form configuration cannot achieve.
Implementing a Custom Authenticator via SPI
To introduce this logic, you implement the Keycloak SPI (Service Provider Interface). You create a class that implements org.keycloak.authentication.Authenticator. This class is instantiated by a factory, org.keycloak.authentication.AuthenticatorFactory, which handles the lifecycle and configuration of your authenticator.
Here is a concrete implementation of a custom authenticator that validates a "session token" passed in the query parameters (simulating a deep-link from a mobile app). Note that for modern Keycloak versions (20+), UriInfo is imported from jakarta.ws.rs.core.
package com.example.keycloak.auth;

import org.keycloak.authentication.AuthenticationFlowContext;
import org.keycloak.authentication.AuthenticationFlowError;
import org.keycloak.models.KeycloakSession;
import org.keycloak.models.RealmModel;
import org.keycloak.models.UserModel;
import org.keycloak.services.messages.Messages;
import jakarta.ws.rs.core.UriInfo;

public class SessionTokenAuthenticator implements org.keycloak.authentication.Authenticator {

    @Override
    public void authenticate(AuthenticationFlowContext context) {
        UriInfo uriInfo = context.getUriInfo();
        String token = uriInfo.getQueryParameters().getFirst("session_token");

        if (token == null || !isValidToken(token)) {
            // Fail the challenge, showing the login form with an error
            context.challenge(context.form().createForm("login-token.ftl", context.getHttpHeaders(),
                Messages.INVALID_TOKEN));
            return;
        }

        // Logic to look up the user associated with the token would go here
        // For this example, we assume the token is valid and we have the user
        UserModel user = lookupUserByToken(token);

        if (user != null) {
            // Mark this step as successful and pass the user to the next node
            context.success();
            // Note: In a real flow, you might need to set the user in the session explicitly
            // context.setUser(user);
        } else {
            context.failureChallenge(AuthenticationFlowError.USER_NOT_FOUND,
                context.form().createForm("login-token.ftl", context.getHttpHeaders(),
                Messages.USER_NOT_FOUND));
        }
    }

    private boolean isValidToken(String token) {
        // Mechanism: Validate token against your backend or cache
        return token.startsWith("valid_");
    }

    private UserModel lookupUserByToken(String token) {
        // Mechanism: Query database or cache
        return null;
    }

    @Override
    public void action(AuthenticationFlowContext context) {
        // Not typically used for simple challenge-response, but required by interface
    }

    @Override
    public boolean requiresUser() {
        return false; // This authenticator runs before user identification
    }

    @Override
    public boolean configuredFor(KeycloakSession session, RealmModel realm, UserModel user) {
        return true;
    }

    // ... Factory implementation required here
}
This code snippet illustrates the mechanism of state transition. The authenticate method is the entry point. By calling context.challenge(...), you force the engine to render a specific FreeMarker template. By calling context.success(), you signal the flow engine to proceed to the next node in the configuration. This is distinct from the standard username/password flow because the logic is entirely decoupled from the standard UsernamePasswordForm authenticator.
Common Pitfalls
When implementing custom authentication flows, developers often encounter specific architectural traps that can lock users out or destabilize the session.
- Infinite Loops: A common error occurs when a custom authenticator calls
failureChallengewithout clearing the previous error state or modifying the flow context, causing the engine to re-render the same form indefinitely. Always ensure thatfailureChallengetransitions the flow state correctly or that the flow configuration prevents re-entry into the same node under the same conditions. - Session State Management: The
AuthenticationSessionContextis transient. If you store critical data (like risk scores or token validation results) only in the session context and the flow is interrupted (e.g., browser refresh), that data is lost. For critical state, persist it in the user session (session.getContext().setUser()) or use a database-backed solution before proceeding. - Flow Ordering and Dependencies: The order of nodes in the flow definition is strict. If a custom authenticator expects a user to be identified (
requiresUser() = true) but is placed before theUsernamePasswordForm(which identifies the user), the flow will fail becauseUserModelwill be null. Always verify therequiresUser()setting aligns with the node's position relative to user identification steps.
Manipulating Form Context for Dynamic UI
Once the Java logic passes control back to the UI, you often need to display dynamic content based on the validation result. Keycloak uses FreeMarker templates for these forms. The critical mechanism here is the AuthenticationSessionContext object, accessible via context.getAuthenticationSession().
Suppose your custom authenticator detected a "High Risk" score during the device check. You want the login form to display a warning banner and hide the password field temporarily until the user acknowledges the risk. You can achieve this by setting an attribute in the session context within the Java code:
// Inside the authenticate method, after detecting high risk
context.getAuthenticationSession().setAuthNote("risk_level", "HIGH");
Then, in your custom FreeMarker template (login-token.ftl), you can access this value to alter the HTML structure. Note that the variable name authSession is the standard alias provided by the Keycloak login forms provider.
<#if authSession.authNote.risk_level == "HIGH">
    <div class="alert alert-warning">
        <i class="fa fa-exclamation-triangle"></i>
        Your device has been flagged for high-risk activity. Please verify your identity.
    </div>
    <input type="hidden" name="risk_acknowledged" value="false">
</#if>
This mechanism allows the backend to drive the frontend UI without requiring a full page reload or a separate AJAX call, keeping the authentication state consistent. The authNote is transient and tied to the specific authentication session, ensuring that once the flow completes, this data is discarded.
Practical Takeaways
- Decouple Logic from Forms: Keep validation logic in Java authenticators and presentation logic in FreeMarker templates. Do not mix business rules with UI rendering.
- Respect Flow Direction: Understand that
context.success()moves to the next node but does not automatically skip nodes unless the flow configuration dictates it. - Leverage
authNote: UseauthSession.authNotefor passing transient data between Java authenticators and FreeMarker templates for dynamic UI adjustments.
FAQ
Q: Can I use custom authentication flows for OAuth/OIDC clients? A: Yes, custom flows are bound to specific clients or client scopes. You can assign a custom flow to a specific OIDC client in the client settings under "Authentication Flow".
Q: Does context.success() automatically log the user in?
A: No. It marks the current authenticator step as complete. To log the user in, you must eventually reach the final authenticator (like DirectGrantAuthenticator or the end of a successful flow) which commits the session.
Q: How do I debug a custom authenticator that fails silently?
A: Enable debug logging for org.keycloak.authentication in your standalone.xml or keycloak.conf. This will reveal the execution path and any exceptions thrown during the authenticate method.
Composing the Flow
Finally, you must assemble these pieces into a flow definition. In the Keycloak Admin Console, under Authentication > Flows, you create a new flow (e.g., "Custom Mobile Flow"). You add your custom authenticator as the first node. You can then add a sub-flow for the standard "Username/Password" verification that only executes if the custom authenticator calls success().
It is crucial to understand the direction of trust. If your custom authenticator fails, the flow stops. If it succeeds, the flow continues. The requiresUser() method in your factory determines if this node runs before or after the user is identified. Setting it to false (as shown in the example) means this logic runs on the anonymous session, allowing you to validate the device or token before the user even enters a username.
This approach provides the necessary granularity for custom security requirements. You are not just changing the look of the login page; you are rewriting the execution logic of the authentication protocol itself. By leveraging the SPI, you gain direct access to the session context, allowing you to inject custom validation rules that the standard Keycloak distribution does not provide out of the box.
Conclusion
Building custom login experiences in Keycloak requires moving beyond template customization to architectural intervention. By understanding the AuthenticationFlow engine, implementing custom Authenticator classes via the SPI, and manipulating the AuthenticationSessionContext, developers can enforce complex, context-aware security policies that align precisely with their application's unique risk profiles.
Call to Action
Audit your current flow configuration today to identify any rigid dependencies that prevent flexible authentication strategies. Review the Keycloak SPI documentation to begin prototyping your first custom authenticator and take control of your security architecture.
Related posts
Building a Custom Authentication Provider in Spring Security
This article covers the implementation of a custom authentication mechanism within Spring Security using a dedicated AuthenticationProvider.
Keycloak Architecture Deep Dive: Internal Components and Data Flow
An examination of Keycloak architecture, internal components, SPI extensions, themes, and the core data model for advanced developers.
Decoding client_secret_basic Default in RFC 8414
An examination of the token_endpoint_auth_methods_supported metadata field in RFC 8414 and why client_secret_basic remains the default authentication method.