Keycloak Themes: Building Custom Login and Account Console Pages
Learn how to build custom login and account console pages in Keycloak using themes and FreeMarker templates for a branded user interface.
When developers approach Keycloak customization, the first instinct is often to simply drop a new style.css file into the theme directory. This approach fails because Keycloak does not merge stylesheets in a way that guarantees precedence over framework defaults. Instead, the UI is generated server-side using FreeMarker templates. To build a truly custom login or account console, you must intervene in the template resolution chain and understand how the server renders HTML before it ever reaches the browser.
This article is Part 7 of the Keycloak Advanced Series.
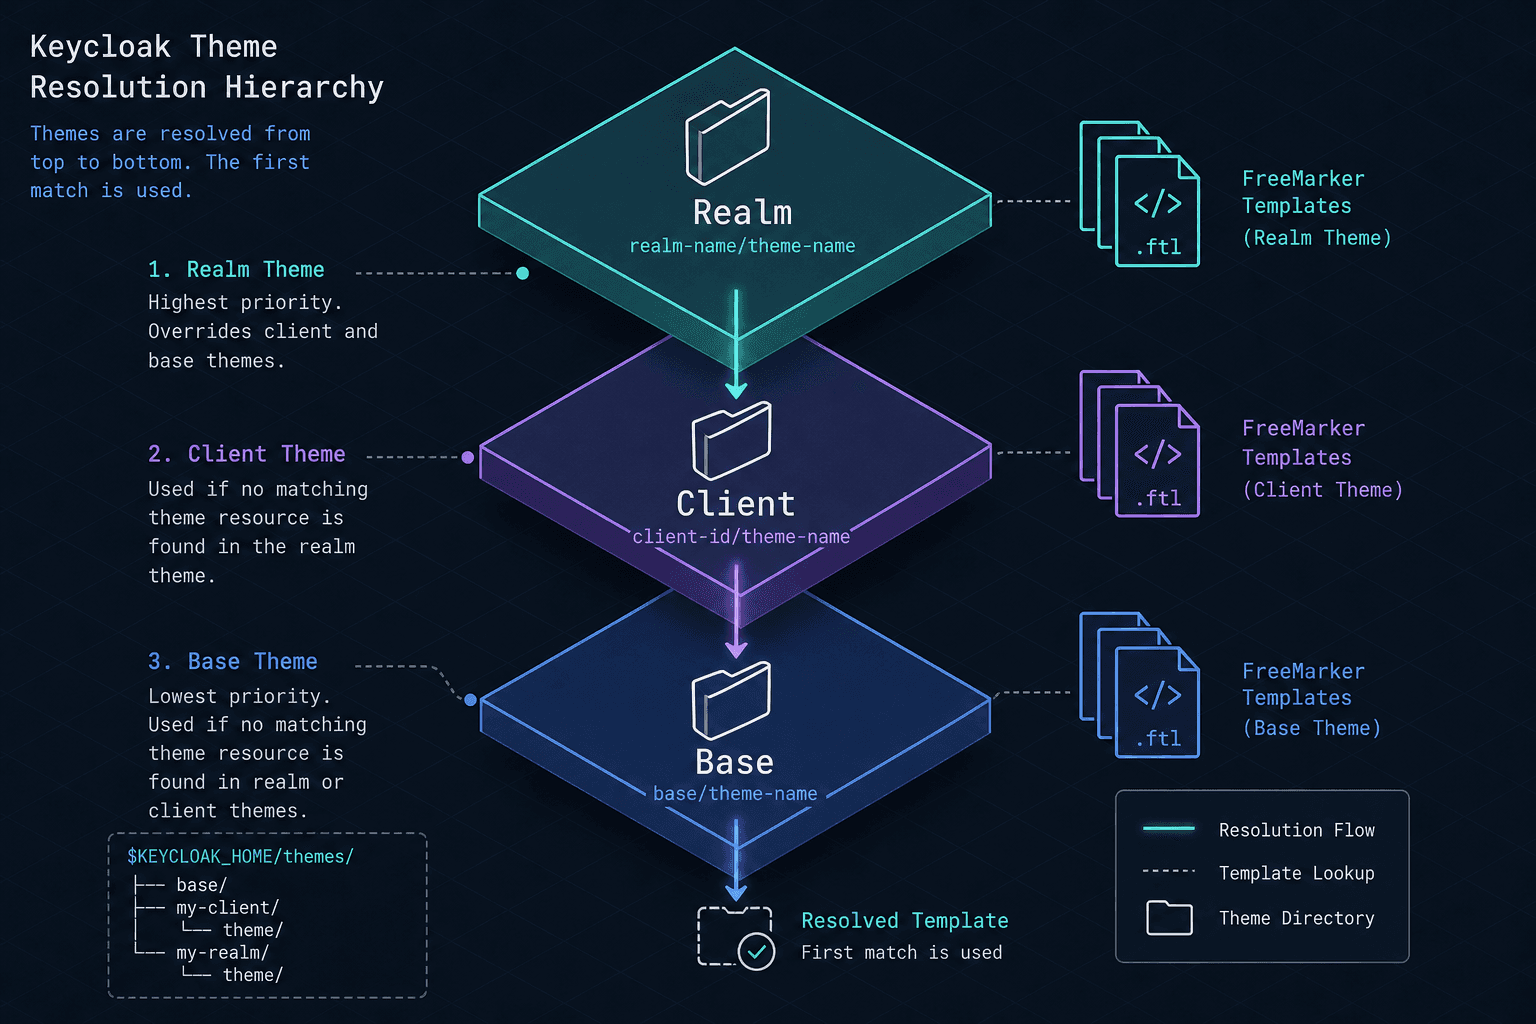
The mechanism begins with the Theme Resolver. When a request hits the /login or /account endpoint, Keycloak determines which theme to use based on a hierarchy. It first checks for a realm-specific theme, then falls back to a client-specific theme, and finally defaults to the base theme provided by the server if no specific theme is configured. If your custom theme is named my-brand, and you place a file at themes/my-brand/login/login.ftl, Keycloak will render that file instead of the default themes/keycloak/login/login.ftl. This is not a CSS override; it is a source replacement.
If you want to keep the default layout but change the colors, you must copy the entire parent template structure to your custom theme and only modify the specific sections you need, or use the theme.properties file to inject static resources like CSS and JS without touching the HTML structure. Crucially, while the resolution hierarchy defaults to 'base' for unknown themes, a custom theme defined in theme.properties without an explicit parent directive may not automatically inherit the macro library unless the parent is explicitly declared. To ensure you have access to standard macros like login.ftl helpers, you should always define parent=base.
To establish a custom theme, you must create a directory structure under your Keycloak installation's themes folder. A standard setup for a login page looks like this:
themes/
  my-brand/
    login/
      resources/
        css/
          custom.css
        js/
          custom.js
      login.ftl
      theme.properties
The theme.properties file is critical. It defines the theme metadata and allows you to reference static resources. Without this file, Keycloak does not know how to load your CSS or JavaScript. You must explicitly define the parent theme if you are extending an existing one.
parent=base
stylesheets=css/custom.css
scripts=js/custom.js
Notice the parent=base directive. This tells Keycloak to inherit all templates and resources from the default base theme. This is the safest way to start. If you do not specify a parent, your theme becomes the root, and you lose access to the default macros and styles unless you copy them manually.
Template Rendering Mechanism
Once the structure is in place, you must address the Template Rendering Mechanism. Keycloak uses FreeMarker to process .ftl files. These files contain static HTML mixed with dynamic logic. The default login.ftl file includes a macro library called login.ftl (which is actually a separate file included at the top) that provides helper functions like <@inputField/> or <@link/>. These macros abstract away the complex form handling and CSRF token injection.
If you simply copy the default login.ftl to your custom theme and try to edit it, you might break the form submission. The reason is that the default template relies on specific variables passed from the backend, such as realm (the current realm object), url (containing the action URL), and messagesPerField (which handles validation errors).
Consider a scenario where you want to hide the "Remember Me" checkbox for a specific client called internal-tools. You cannot do this with CSS alone because the element might be hidden, but the form still submits the parameter. You must modify the template logic.
Open your themes/my-brand/login/login.ftl. At the top, you will see an include statement relative to the theme root:
<#include "login.ftl">This line pulls in the global macros. Below that, you will find the main form structure. To conditionally render the "Remember Me" field, you wrap the input in a FreeMarker conditional block checking the client attributes:
<#if !client.attributes?has_content('rememberMe') && client.attributes['rememberMe'] != 'true'>
    <div class="form-group">
        <input type="checkbox" name="rememberMe" id="rememberMe" />
        <label for="rememberMe">Remember me</label>
    </div>
</#if>
The variable client refers to the client configuration. This check verifies if the rememberMe attribute is explicitly set to true. If it is not, the HTML is generated. This is a mechanism-level change. If you only hid it with CSS, the browser would still send the parameter, potentially causing logic errors in your application if it expects the field to be absent.
Account Console Specifics
For the Account Console, the mechanism is similar but the template structure differs. The account console is used when a user manages their profile, not when they log in. The primary entry point is usually account.ftl, but the actual content is often rendered via manage-account.ftl or profile.ftl.
When customizing the account console, you must ensure you are targeting the correct theme context. The account console often runs in a different namespace than the login page. You must verify that your custom theme is active for the account console. In many cases, the account console inherits from the account theme, not login.
themes/
  my-brand/
    account/
      resources/
        css/
          account-custom.css
      manage-account.ftl
      theme.properties
In manage-account.ftl, you might want to change the label of the "Update Profile" button or reorder the fields. The FreeMarker syntax remains the same. You can iterate over the profile attributes using loops:
<#list account.profile.attributes?keys as attrName>
    <#assign attr = account.profile.attributes[attrName]>
    <div class="form-group">
        <label for="${attrName}">${attr.label}</label>
        <input type="${attr.type}" name="${attrName}" value="${attr.value}" />
    </div>
</#list>
This loop dynamically renders fields based on the realm's configuration. If you want to force a specific field to appear first, you can reorder the list or hardcode the HTML for that specific field and exclude it from the loop.
Resource Caching and Dependency Injection
A common pitfall is Resource Caching. Keycloak caches the compiled FreeMarker templates. If you update a .ftl file and the changes do not appear, it is not a code error; it is a caching issue. The method to disable caching depends on your Keycloak version. In modern versions, you can set cacheTemplates=false in theme.properties for development.
cacheTemplates=falseIn production, or if theme.properties settings do not take effect immediately, you may need to restart the Keycloak server or trigger a cache invalidation to see template changes. Alternatively, you can pass the flag -Dkeycloak.theme.cache=false at startup. This is a performance optimization, but it means your deployment pipeline must include a restart step or a cache-clearing command after theme updates.
Finally, consider the Dependency Injection of static assets. When you define stylesheets=css/custom.css in theme.properties, Keycloak generates a <link> tag pointing to the correct URL. However, if you have multiple themes active (e.g., one for login, one for account), you must ensure the paths are relative to the theme root. Absolute paths often break because the base URL might change depending on the context.
To summarize, building custom Keycloak pages is not a styling exercise; it is a template engineering task. You must navigate the FreeMarker rendering engine, override specific templates to inject logic, and manage the resource loading hierarchy. The most robust approach is to extend the base theme, use theme.properties to declare dependencies, and use FreeMarker conditionals to control the DOM structure rather than relying on client-side CSS to hide elements. This ensures that the authentication flow remains consistent, secure, and predictable across all environments.
Conclusion
Mastering Keycloak themes requires moving beyond simple CSS overrides and engaging directly with the FreeMarker rendering pipeline. By understanding the theme resolution hierarchy, correctly structuring your themes directory, and utilizing FreeMarker directives for conditional logic, you can create deeply integrated, branded user experiences. Remember to manage caching carefully and always test your templates against the actual request context variables to avoid runtime errors.
FAQ
Q: Why does my custom CSS not load even though I added it to theme.properties?
A: Ensure the path in stylesheets is relative to the theme root (e.g., css/custom.css) and that the file actually exists at themes/your-theme/resources/css/custom.css. Also, check that parent=base is set if you are relying on inherited resources.
Q: How do I debug FreeMarker errors in my custom templates?
A: Enable debug logging for the org.keycloak package in your Keycloak configuration. This will provide stack traces for any FreeMarker template parsing errors, helping you identify missing variables or syntax issues.
Q: Can I use external CSS libraries like Bootstrap in Keycloak themes?
A: Yes, you can include external CSS or JS by linking to CDN URLs within your custom .ftl files, but it is generally recommended to host these assets locally within your theme's resources folder to avoid external dependencies and ensure offline functionality.
Common Pitfalls
- Absolute Include Paths: Using
<#include "/login.ftl">attempts to load from the server root, which fails in theme contexts. Always use relative paths like<#include "login.ftl">. - Missing Parent Declaration: Failing to set
parent=baseintheme.propertiescauses your theme to lose access to standard macros and default styles, requiring you to manually copy the entire base theme structure. - Ignoring Caching: Modifying
.ftlfiles without clearing the server cache or restarting the instance results in the old template being served, leading to confusion during development.
Practical Takeaways
- Always extend
base: Defineparent=baseintheme.propertiesto safely inherit macros and styles without manual copying. - Logic over CSS: Use FreeMarker conditionals to hide or modify form elements at the source level to prevent unwanted data submission.
- Verify Caching Strategies: Configure
cacheTemplates=falsefor development and plan for server restarts or cache invalidation in production deployments.
Related posts
Keycloak Custom Authentication Flows: Building Custom Login Experiences
An examination of Keycloak authentication flows, custom auth strategies, and SPI implementation for building tailored login experiences.
Decoding client_secret_basic Default in RFC 8414
An examination of the token_endpoint_auth_methods_supported metadata field in RFC 8414 and why client_secret_basic remains the default authentication method.
Building Identity-Aware Load Balancing with NGINX and Keycloak
Learn how to implement identity-aware load balancing using NGINX and Keycloak for secure authentication routing.