Building a Custom Login Theme With FreeMarker
Learn to build a custom Keycloak login theme using FreeMarker templates, covering login.ftl, i18n, and theme structure.
Keycloak does not rely on modern client-side frameworks like React or Vue for its authentication flows. Instead, it serves static HTML pages rendered server-side using FreeMarker, a Java-based template engine. For frontend developers, this architectural shift means you are no longer managing state in JavaScript but rather manipulating the data model passed by the server and injecting CSS/JS into a specific directory structure for your keycloak custom login page.
This guide is Part 2 of the Keycloak Themes and SPIs series.
Understanding this mechanism is crucial because customization is not just about changing colors; it’s about overriding template fragments and managing internationalization strings that the server injects.
The Mechanism of Theme Inheritance
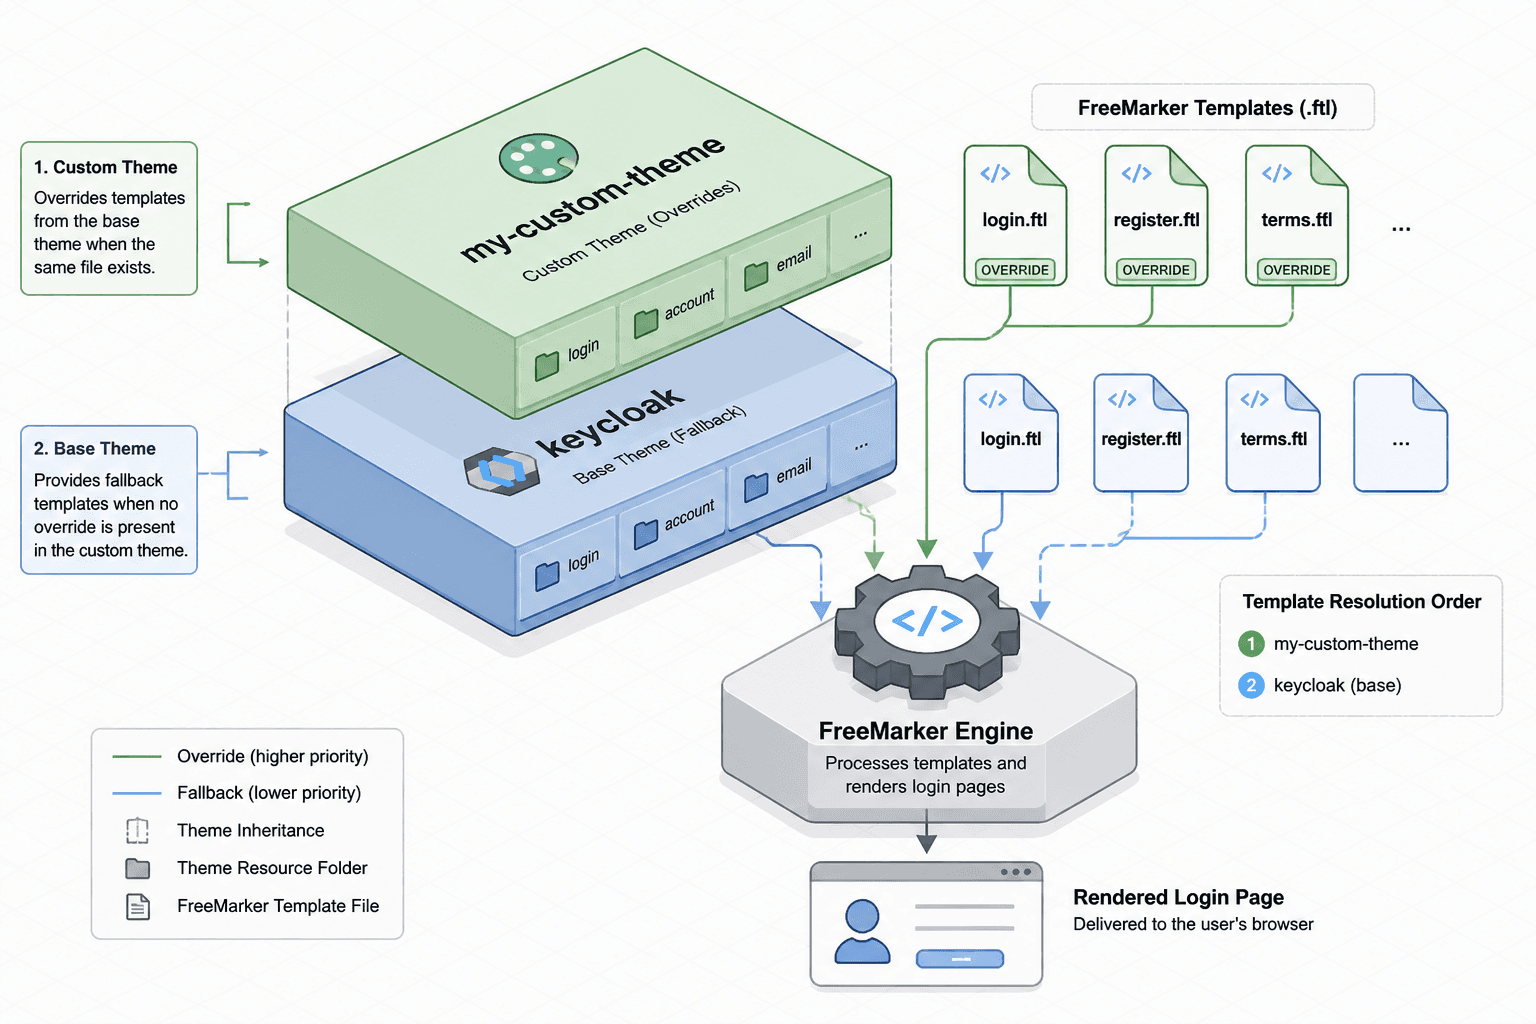
Keycloak themes operate on a hierarchical inheritance model. When a user navigates to the login page, Keycloak does not load a single file. It resolves a chain of templates based on the configured theme.
The default theme is keycloak. If you create a custom theme named my-custom-theme, Keycloak looks for templates in this order:
my-custom-theme/login/login.ftlkeycloak/login/login.ftl(fallback)
If the file exists in your custom theme, it is used. If not, Keycloak falls back to the base theme. This inheritance model is the foundation for building a keycloak custom login page that matches your brand, allowing you to override only the parts you need, such as the logo or the error message layout, without rewriting the entire authentication flow.
Anatomy of login.ftl
The entry point for the login page is login.ftl. This file is a FreeMarker template that receives a data model from the Keycloak server. The most critical part of this model is the msg function, which provides access to localized strings. This template is central to defining the structure of your keycloak custom login page.
Here is a simplified structure of login.ftl:
<#import "template.ftl" as layout>
<@layout.mainLayout title="${msg('loginTitle')}" contentId="loginContent">
  <div id="kc-container" class="${properties.kcContainerClass!}">
    <div id="kc-header" class="${properties.kcHeaderClass!}">
      <div id="kc-header-wrapper"
        class="${properties.kcHeaderWrapperClass!}">${msg('loginTitleHtml')}</div>
    </div>

    <div class="${properties.kcContentWidthClass!}">
      <div id="kc-content" class="${properties.kcContentClass!}">
        <div id="kc-content-wrapper">

          <!-- Error messages are handled via the 'messages' object -->
          <#if message?has_content && message.type == 'error'>
            <div class="alert alert-error">
              ${message.summary}
            </div>
          </#if>

          <form id="kc-form" action="${url.loginAction}" method="post">
            <div id="kc-form-fields">
              <label for="username" class="${properties.kcLabelClass!}">${msg('username')}</label>
              <input id="username" class="${properties.kcInputClass!}" name="username" type="text" autofocus autocomplete="off" />

              <label for="password" class="${properties.kcLabelClass!}">${msg('password')}</label>
              <input id="password" class="${properties.kcInputClass!}" name="password" type="password" autocomplete="off" />
            </div>

            <input type="hidden" id="id-hidden-input" name="credentialId" />
          </form>
        </div>
      </div>
    </div>
  </div>
</@layout.mainLayout>
Key Mechanisms in the Template
- Macro Import:
<#import "template.ftl" as layout>imports the base layout. This ensures consistent headers, footers, and CSS links across all Keycloak pages. - Message Resolution:
${msg('loginTitle')}calls a helper function that looks up the keyloginTitlein the i18n files. If the key is missing, it returns the key itself. - Conditional Rendering:
<#if message?has_content>checks if the server passed an error message. This is how Keycloak displays "Invalid username or password" without JavaScript. - Form Action:
action="${url.loginAction}"is dynamically generated by the server to include the correct realm and client context.
Internationalization (i18n)
In frontend frameworks, i18n is often handled by JSON files loaded in the browser. In Keycloak, i18n is handled server-side. You create a file named messages.properties (or messages_en.properties for English) in your theme’s directory.
# messages.properties
loginTitle=Sign in to my-app
loginTitleHtml=Sign in to <strong>my-app</strong>
username=Username
password=Password
doLogIn=Log In
doRegister=Register
invalidUserMessage=Invalid username or password.
The template accesses these values using the msg() function. Note that loginTitleHtml allows HTML tags, which are sanitized by Keycloak’s built-in XSS protection unless explicitly marked as safe.
Why Separate Files?
Separating strings from templates allows administrators to translate the UI into any language without modifying Java code or template logic. When a user’s browser sends an Accept-Language header, Keycloak selects the appropriate .properties file and populates the messages object in the data model.
Practical Implementation Steps
To implement a custom login theme, follow these steps:
1. Directory Structure
Create the following structure in your project:
my-custom-theme/
├── login/
│   ├── login.ftl
│   └── messages.properties
├── resources/
│   ├── css/
│   │   └── styles.css
│   └── img/
│       └── logo.png
└── theme.properties
2. Configure theme.properties
This file tells Keycloak about your theme.
parent=keycloak
import=common/keycloak

styles=css/styles.cssparent=keycloak: Inherits from the base Keycloak theme.import=common/keycloak: Imports common resources like fonts and base CSS.styles=css/styles.css: Links your custom CSS.
3. Deploy the Theme
Place the my-custom-theme directory in Keycloak’s themes directory. Restart Keycloak.
4. Associate Theme with Realm
In the Keycloak Admin Console:
- Go to Realm Settings > Themes.
- Set Login Theme to
my-custom-theme. - Save.
Common Pitfalls
- Static Resources: Ensure your CSS and JS files are in the
resourcesdirectory. If you link to/css/styles.cssin your HTML, Keycloak will look for it in the theme’s root, not the resources folder. Use theurl.resourcesPathvariable if needed, but typically, thestylesdirective intheme.propertieshandles this. - CSRF Tokens: Never remove the hidden input fields in the form. Keycloak's CSRF protection relies on the signed code embedded in
url.loginAction, and hidden inputs such ascredentialIdare required for correct form submission. If you modify the form structure, ensure you preserve all hidden inputs. - Caching: Keycloak caches templates. After making changes, restart Keycloak or clear the cache in the Admin Console to see updates.
- Consistency: When building a keycloak custom login page, ensure that your custom styles do not break accessibility standards or responsive behavior inherited from the base theme.
Conclusion
Building a custom login theme in Keycloak requires a shift from client-side rendering to server-side template manipulation. By understanding the FreeMarker syntax, the inheritance hierarchy, and the i18n mechanism, you can create a login experience that matches your brand while maintaining security and accessibility. Start by overriding login.ftl and messages.properties, then gradually add custom CSS and JavaScript as needed to complete your keycloak custom login page.
Related posts
Branding a Keycloak Login: CSS, Assets, and Email Templates
Learn how to customize Keycloak login pages using CSS, assets, and email templates for a branded user experience.
Keycloak Themes: Building Custom Login and Account Console Pages
Learn how to build custom login and account console pages in Keycloak using themes and FreeMarker templates for a branded user interface.
Keycloak Theme Structure and the Base Theme
A technical overview of Keycloak's theme structure, focusing on the base theme, theme.properties, and inheritance mechanisms for frontend developers.