OpenID Connect Frontend and Backend Integration Guide
A walkthrough of OpenID Connect integration for frontend and backend systems, covering Angular and Spring Boot implementations.
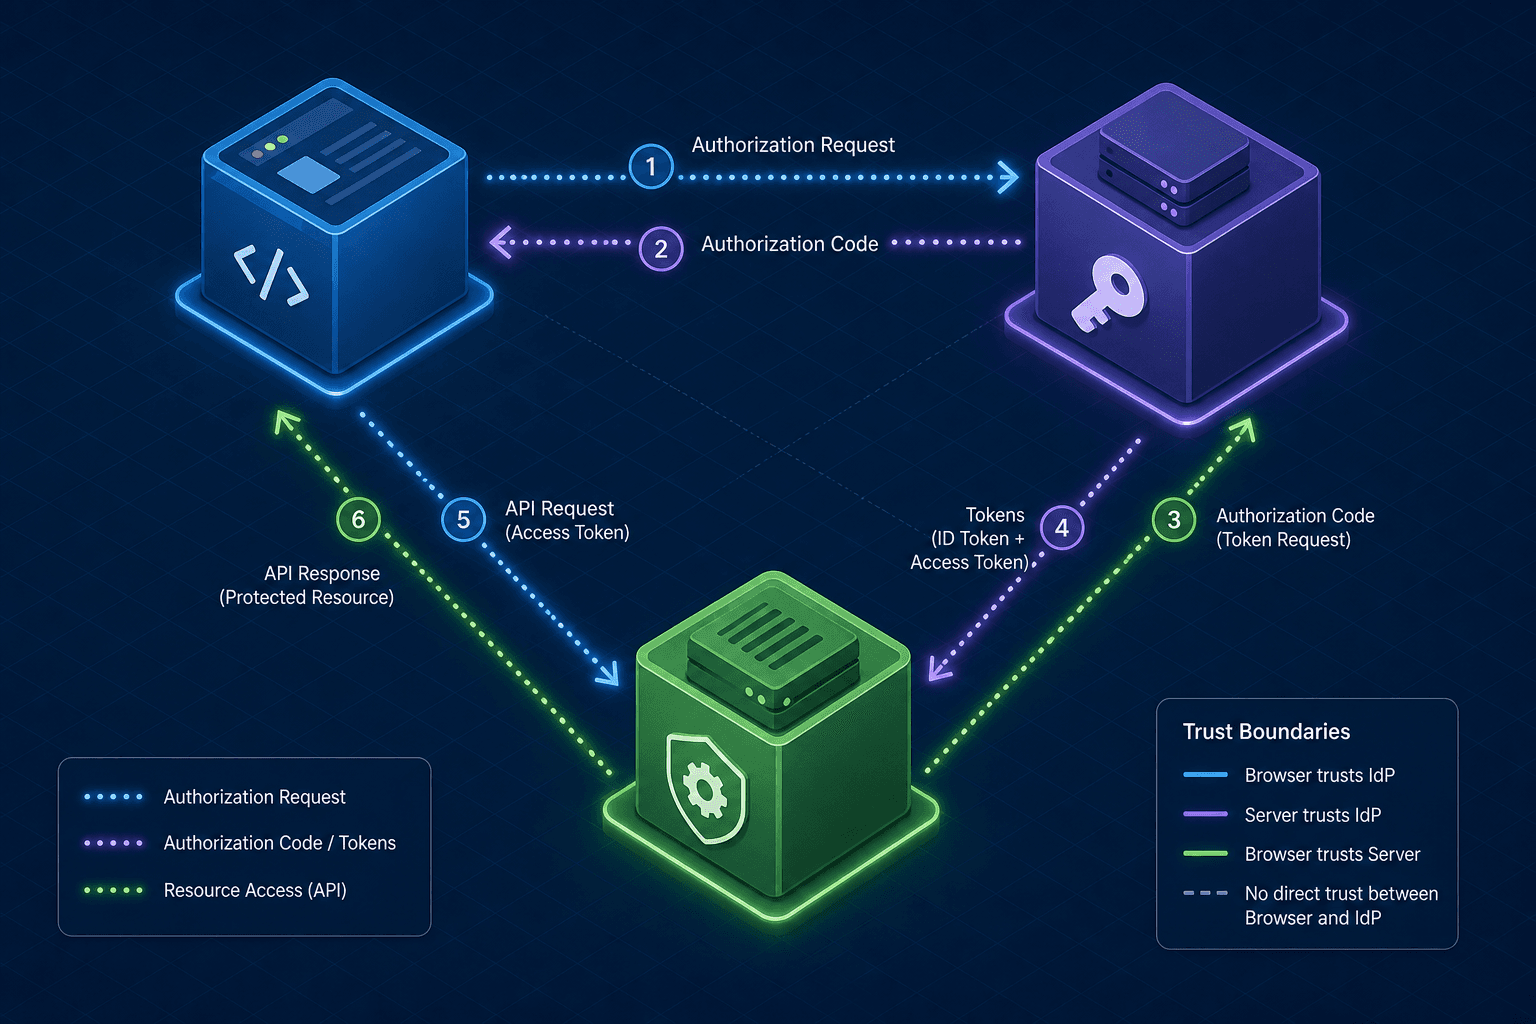
The confusion surrounding OpenID Connect (OIDC) often stems from treating it as a simple login button rather than a complex state machine involving three distinct parties: the user, the client application, and the identity provider. In a full-stack architecture, the frontend (Angular) and the backend (Spring Boot) must not share the same trust model. The frontend operates in an untrusted environment where it cannot hide secrets, while the backend operates in a trusted environment where it must verify the authenticity of the user without ever seeing the user's password. The core mechanism that bridges these two worlds is the Access Token, a cryptographically signed JWT (JSON Web Token) that proves the user's identity and scope to the backend without requiring the backend to query the identity provider for every request.
The Authorization Code Flow with PKCE
To secure the initial handshake, we must implement the Authorization Code Flow with Proof Key for Code Exchange (PKCE). This mechanism solves the problem of how a public client (like a browser-based Angular app) can securely obtain a token without a client secret. The flow begins when the user, let's call him Alex, navigates to the Angular application. The Angular app generates a random code_verifier string that is a high-entropy cryptographically random value with a length between 43 and 128 characters, as mandated by RFC 7636. It then derives a code_challenge from this verifier using SHA-256 hashing. This challenge is sent to the Identity Provider (IdP) in the initial authorization request.
When the IdP validates the request and redirects Alex back to the application with an authorization code, the Angular app must present the original code_verifier. The IdP hashes this verifier and compares it to the previously received challenge. If they match, the IdP issues the tokens. This prevents replay attacks where an attacker might intercept the authorization code and try to exchange it themselves, as they would lack the specific code_verifier generated by the browser session.
// Angular: Generating the code challenge (simplified logic)
const codeVerifier = generateRandomString(128); // High-entropy, 43-128 chars per RFC 7636
const codeChallenge = await generateCodeChallenge(codeVerifier);
const authUrl = `https://idp.example.com/authorize?response_type=code&client_id=angular-app&redirect_uri=${redirect}&code_challenge=${codeChallenge}&code_challenge_method=S256`;
This mechanism ensures that even if the redirect URL is intercepted, the token exchange fails because the attacker cannot reconstruct the code_verifier.
Frontend Implementation: Angular as the Public Client
In the Angular application, the goal is to manage the token lifecycle without persisting it in localStorage or sessionStorage, which are vulnerable to Cross-Site Scripting (XSS) attacks. Instead, we store the Access Token and Refresh Token in memory. We rely on the @angular-auth/oidc-client library to orchestrate the flow. When Alex logs in, the library handles the redirect to the IdP, captures the response, and exchanges the code for tokens.
Crucially, the Angular app must configure a silent renewal strategy. Access tokens have short lifespans (e.g., 15 minutes). The Angular service listens for the token expiration event and automatically uses the Refresh Token to fetch a new Access Token in the background using a hidden iframe or background fetch, avoiding page reloads. This ensures the "silent" claim holds true; if a redirect were to occur, it would force a full re-authentication and clear the in-memory store. The library also injects the OidcSecurityService into the HttpClient interceptors. This interceptor inspects every outgoing HTTP request; if an Access Token exists in memory, it appends the Authorization: Bearer <token> header.
// Angular: Configuring the OIDC security service
import { OidcSecurityService } from 'angular-auth-oidc-client';

@Injectable({ providedIn: 'root' })
export class AuthService {
  constructor(private oidcSecurityService: OidcSecurityService) {}

  isAuthenticated(): Observable<boolean> {
    return this.oidcSecurityService.isAuthenticated$;
  }

  getToken(): Observable<string> {
    return this.oidcSecurityService.getAccessToken();
  }
}
This architecture keeps the frontend "dumb" regarding token validation; it simply acts as a conduit, passing the token to the backend. The frontend never attempts to decode or validate the JWT payload, as that logic belongs strictly to the resource server.
Backend Implementation: Spring Boot as the Resource Server
The Spring Boot backend does not participate in the login flow. It acts solely as a Resource Server. When Alex's Angular app sends a request to fetch his profile data, the Spring Boot application receives the JWT in the Authorization header. The backend's job is to verify that this token was issued by a trusted Identity Provider and has not been tampered with.
We achieve this using spring-boot-starter-oauth2-resource-server. The framework automatically discovers the Identity Provider's JSON Web Key Set (JWKS) endpoint based on the issuer configuration. The JWKS contains the public keys used to sign the tokens. Spring Boot downloads these keys and caches them locally. When a request arrives, the JwtAuthenticationConverter extracts the token and verifies its signature using the cached public key. If the signature is invalid or the token is expired, the request is rejected with a 401 Unauthorized immediately, before any business logic executes.
// Spring Boot: Security Configuration
@Configuration
public class SecurityConfig {

    @Bean
    public SecurityFilterChain filterChain(HttpSecurity http) throws Exception {
        http
            .oauth2ResourceServer(oauth2 -> oauth2
                .jwt(jwt -> jwt
                    .jwtAuthenticationConverter(jwtToken -> {
                        // Custom logic to map claims to authorities if needed
                        return jwtToken;
                    })
                )
            );
        return http.build();
    }
}
This mechanism relies on the fact that the backend trusts the IdP's public key. It does not need to make a network call to the IdP for every request, which significantly reduces latency compared to token introspection.
The Full-Stack Data Flow
To visualize the trust boundary, consider Alex requesting his user profile from the API.
- Initiation: Alex clicks "Profile" in the Angular app. The
OidcSecurityServicechecks its in-memory store. If the Access Token is present and valid, the interceptor addsAuthorization: Bearer eyJhbGciOiJSUzI1NiIs.... - Transmission: The request travels over HTTPS to the Spring Boot endpoint
/api/user/profile. The Angular app never sees the response body until the backend processes it. - Validation: Spring Boot's
SecurityFilterChainintercepts the request. It extracts the JWT and verifies the signature against the cached JWKS. It also checks theexp(expiration) claim. - Execution: If valid, Spring Boot creates a
JwtAuthenticationTokenand sets it as the currentSecurityContext. The controller method executes, returning the JSON data. - Failure Scenario: If Alex's token expired and the silent renewal failed (without a redirect), the Angular app would receive a 401. The interceptor would then trigger a redirect to the IdP for re-authentication, resetting the flow.
This separation ensures that the Angular frontend never needs to know the backend's API secrets, and the backend never needs to know the user's password. The token is the sole artifact of trust, signed by the IdP and verified by the backend.
Operational Tradeoffs
One common misconception is that storing tokens in localStorage is acceptable for simplicity. This is a critical error. If an attacker can inject JavaScript into your Angular page (XSS), they can read localStorage and steal the token, allowing them to impersonate Alex on any server that trusts that token. Storing tokens in memory restricts the attack surface to the specific session tab, though XSS remains a risk if the attacker can execute code within that specific context. Another tradeoff is the complexity of handling refresh tokens. While the Angular library handles the silent renewal, you must ensure your IdP allows refreshing from the browser context and that your backend does not expose a refresh endpoint that could be abused by a malicious frontend. Using Refresh Tokens in a public client (browser) is an extension pattern requiring specific IdP support and token rotation, distinct from the standard OIDC flow for public clients.
The choice between JWT validation and token introspection is also a design decision. JWT validation (used here) is stateless and fast but requires key rotation logic. Token introspection (calling the IdP to ask "is this token valid?") is stateful and slower but handles revocation immediately. For most modern microservices architectures, JWT validation with a short-lived token and a rotating key set is the standard approach.
By adhering to the Authorization Code Flow with PKCE and strictly separating the responsibilities of the public client and the resource server, you create a system where the frontend handles the user experience and the backend enforces the security policy. The mechanism is secure because it relies on cryptographic signatures rather than shared secrets, making the integration resilient even as the application scales.
Common Pitfalls
Implementing OIDC correctly requires avoiding several common traps that can compromise security or functionality:
- Ignoring Clock Skew: Servers and clients often have slightly different system clocks. If the token's
nbf(not before) orexp(expiration) times are checked strictly, valid tokens might be rejected. Always configure your JWT validator to allow a tolerance (e.g., +/- 30 seconds) for clock skew. - Missing State Parameter Validation: The
stateparameter in the authorization request is a CSRF protection mechanism. If the frontend does not generate a uniquestatevalue and verify it upon the callback, an attacker could inject a fake authorization code to hijack the user's session. - Static Refresh Tokens: If refresh tokens are not rotated upon use (Refresh Token Rotation), an attacker who steals a refresh token can reuse it indefinitely until the Access Token naturally expires. Implementing rotation ensures that a stolen token becomes invalid immediately after the legitimate user uses it.
Practical Takeaways
To simplify OIDC integration, keep these mental models in mind:
- Frontend never validates JWT: The browser client should treat the Access Token as an opaque string to be passed to the backend. It should never attempt to decode or verify the signature.
- Backend treats tokens as opaque strings: The backend assumes the token is valid if the signature is correct. It should not rely on the frontend for access control decisions beyond passing the token.
- Trust boundaries are strict: The frontend is public and untrusted; the backend is private and trusted. Never expose backend secrets or logic to the frontend.
- Silent renewal requires IdP support: Ensure your Identity Provider supports silent authentication via hidden iframes or background fetches to maintain the user session without interruption.
FAQ
Why not store tokens in localStorage?
Storing tokens in localStorage exposes them to Cross-Site Scripting (XSS) attacks. Any malicious script injected into your page can read the storage and steal the token. Storing tokens in memory limits exposure to the specific browser session tab.
What is the difference between Access and Refresh Tokens? An Access Token is short-lived and used to access resources (API calls). A Refresh Token is long-lived and used to obtain new Access Tokens when the current one expires. In a public client like a browser, Refresh Tokens require careful handling and rotation to prevent abuse.
Do I need to implement PKCE manually?
While you can implement PKCE manually, most modern OIDC libraries for Angular and Spring Boot handle the code_verifier generation and code_challenge derivation automatically. You should only configure your IdP to support PKCE and ensure your library is set to use it.
Next Steps
To solidify your understanding and implement these patterns correctly, review the RFC 7636 specification for PKCE details. Additionally, configure your Identity Provider to explicitly support PKCE and test your application's behavior under token expiration and network failure scenarios.
Conclusion
Implementing OpenID Connect across a full-stack architecture requires a clear understanding of the distinct roles played by the frontend and backend. By utilizing the Authorization Code Flow with PKCE, storing tokens securely in memory, and leveraging Spring Boot's built-in JWT validation capabilities, developers can build secure, scalable applications that respect the boundaries between public and private environments. This approach ensures that sensitive credentials remain protected while providing a smooth user experience.
Related posts
How Browser Cookies Work in SSO: A Technical Deep Dive
An examination of how browser cookies function within Single Sign-On systems, covering SameSite attributes, third-party cookie limitations, and cross-domain security.
RFC 9700: The Mandatory Guardrails for OAuth 2.0
An examination of RFC 9700, detailing OAuth 2.0 security best current practices, including mitigation of mix-up attacks and redirect URI validation.
Decoding client_secret_basic Default in RFC 8414
An examination of the token_endpoint_auth_methods_supported metadata field in RFC 8414 and why client_secret_basic remains the default authentication method.