OIDC and SAML Identity Brokering in Keycloak
A technical walkthrough of configuring OIDC and SAML identity brokering in Keycloak, covering first broker login flows and mapper configurations.
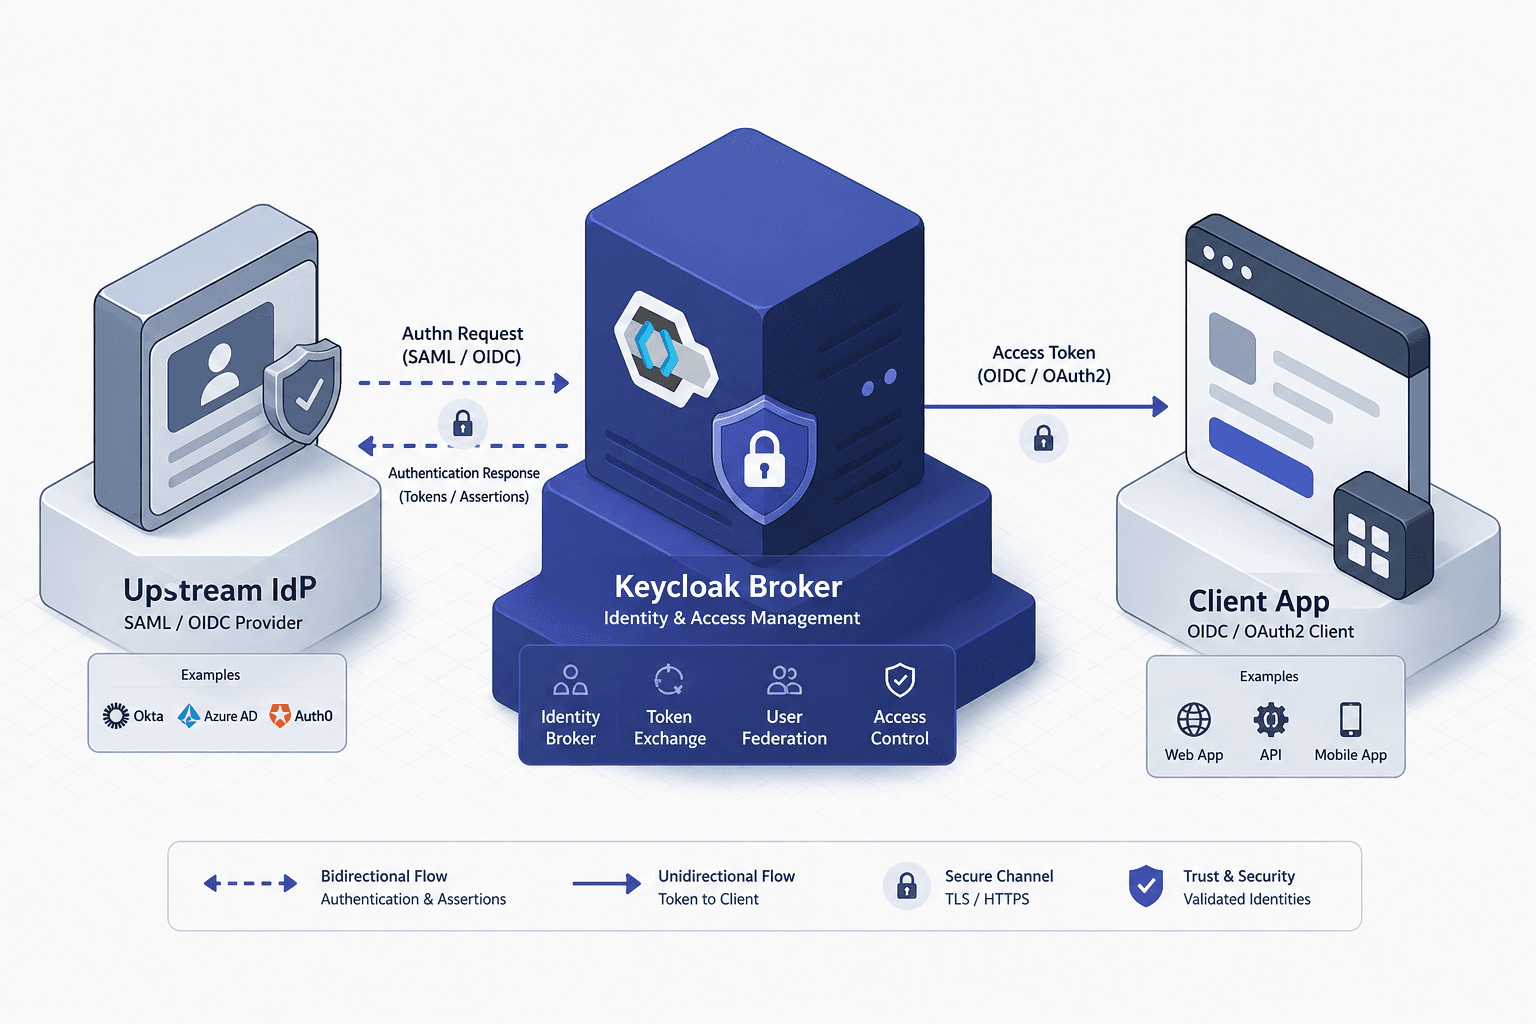
Identity brokering allows Keycloak to act as an intermediary, delegating authentication to an upstream provider (like Google, Azure AD, or an internal SAML IdP) while maintaining a unified identity model for downstream clients. For identity engineers, the complexity lies not in the initial connection, but in the First Broker Login flow and the precise mapping of attributes from the upstream protocol to Keycloak’s internal user model.
This guide is Part 4 of the Keycloak Identity Federation series.
The Broker Flow Mechanism
The process of identity-brokering is a standard pattern in identity-federation architectures, where Keycloak handles the authentication delegation step by interacting with upstream providers. This flow is a core component of identity-federation designs, ensuring that user credentials remain within the upstream provider's domain.
When a user initiates authentication through a Keycloak-protected application, Keycloak checks if the user exists in its local database. If the user is unknown, Keycloak checks if any configured identity providers match the incoming authentication request.
The mechanism works as follows:
- Redirect: Keycloak redirects the user’s browser to the upstream provider’s authorization endpoint. This step initiates the OAuth 2.0 Authorization Code Grant flow [RFC 6749].
- Authentication: The user authenticates with the upstream provider. The provider validates the user's credentials and issues an authorization code.
- Response: The upstream provider redirects back to Keycloak’s callback URL with an authorization code (OIDC) or SAML assertion.
- Token Exchange: Keycloak exchanges the code for an access/ID token (OIDC) or validates the SAML assertion. In OIDC, the ID token is a JSON Web Token (JWT) as defined in [RFC 7519], containing claims about the authentication event.
- User Resolution: Keycloak determines if this corresponds to an existing local user or requires creation/linking.
This flow ensures that downstream clients never see the upstream credentials. They only receive a Keycloak session token.
First Broker Login & User Matching
The most critical phase is First Broker Login. This occurs when a user authenticates via an identity provider for the first time in Keycloak. Keycloak must decide whether to:
- Create a new local user: If no matching user exists.
- Link an existing user: If a user already exists in Keycloak’s local database or another provider.
User Matching Logic
Keycloak uses a unique identifier to match users. For OIDC, this is typically the sub claim. For SAML, it is often the NameID or a custom attribute marked as unique.
If a match is found, Keycloak can either:
- Auto-link: Immediately link the upstream identity to the existing local user.
- Prompt for confirmation: Ask the user to confirm the link if multiple potential matches exist or if auto-linking is disabled.
If no match is found, Keycloak creates a new local user. The attributes of this new user are populated from the upstream provider’s claims.
Attribute Mappers & Data Transformation
Upstream providers send attributes in various formats. Keycloak uses Mappers to transform these attributes into its internal model. Mappers are essential for ensuring that downstream clients receive consistent data, regardless of the upstream provider’s schema, and that authentication attributes are correctly propagated.
OIDC Mapper Example
Consider an OIDC provider that returns the following ID token payload:
{
  "sub": "user123",
  "email": "user@example.com",
  "name": {
    "givenName": "John",
    "familyName": "Doe"
  },
  "roles": ["admin", "user"]
}
To map givenName to Keycloak’s givenName attribute, you configure an Attribute Importer:
- Mapper Type: Attribute Importer
- Claim:
name.givenName(using JSON path notation) - User Attribute:
givenName
SAML Mapper Example
For SAML, the process is similar but relies on XML attribute names. If a SAML assertion contains:
<Attribute Name="http://schemas.xmlsoap.org/ws/2005/05/identity/claims/emailaddress">
  <AttributeValue>user@example.com</AttributeValue>
</Attribute>
You configure an Attribute Importer:
- Mapper Type: Attribute Importer
- SAML Attribute:
http://schemas.xmlsoap.org/ws/2005/05/identity/claims/emailaddress - User Attribute:
email
Common Pitfalls
- Missing Claims: If the upstream provider does not send a required claim, the mapped attribute will be null. Always verify the upstream token/assertion content.
- Case Sensitivity: JSON path matching in OIDC mappers is case-sensitive. Ensure the claim name matches exactly.
- Multiple Values: Some attributes may contain multiple values. Keycloak handles this by creating multi-valued attributes, but downstream clients must be prepared to handle arrays.
Practical Configuration Walkthrough
This walkthrough demonstrates practical identity-brokering configuration and is part of an identity-federation setup. We will configure an OIDC identity provider for a hypothetical service called MyOAuthProvider.
Step 1: Add Identity Provider
- Navigate to Realm Settings > Identity Providers.
- Click Add Provider and select OpenID Connect v1.0.
- Set Alias to
my-oauth-provider. - Enter Client ID and Client Secret from
MyOAuthProvider. - Set Authorization URL and Token URL to
MyOAuthProvider’s endpoints.
Step 2: Configure Mappers
- In the provider configuration, go to the Mappers tab.
- Click Create to add a new mapper.
- Select Attribute Importer.
- Configure the mapping for
email:- Claim:
email - User Attribute:
email
- Claim:
- Save the mapper.
Step 3: Test First Broker Login
- Initiate authentication from a client application using
my-oauth-provideras the provider. - Authenticate with
MyOAuthProvider. - Observe the First Broker Login screen. If a user with the same email exists in Keycloak, you will be prompted to link the accounts. If not, a new user will be created. This step verifies the authentication result and confirms that the identity-brokering flow has completed successfully.
Conclusion
Identity brokering in Keycloak is an effective mechanism for federating identities. By understanding the First Broker Login flow and correctly configuring Attribute Mappers, you can ensure a consistent experience for users across multiple providers. Always validate upstream claims and test edge cases, such as missing attributes or conflicting user identities, to maintain reliable identity management.
Related posts
Keycloak User Federation vs Identity Provider
Understand the distinction between Keycloak user federation and identity providers for effective identity management.
Keycloak Architecture: Realms, Clients, and the Data Model
An examination of Keycloak architecture, focusing on realms, clients, and the underlying data model for platform and identity engineers.
Multi-Factor Authentication with OIDC: Implementing MFA
An examination of implementing multi-factor authentication using OIDC, covering Keycloak, WebAuthn, TOTP, and step-up authentication via ACR.