Angular OAuth2/OIDC: Guards, Interceptors & Claims
Learn how to implement route guards, HTTP interceptors, and identity claims in Angular for secure OAuth2/OIDC authentication.
Route Guards, HTTP Interceptors, and Identity Claims
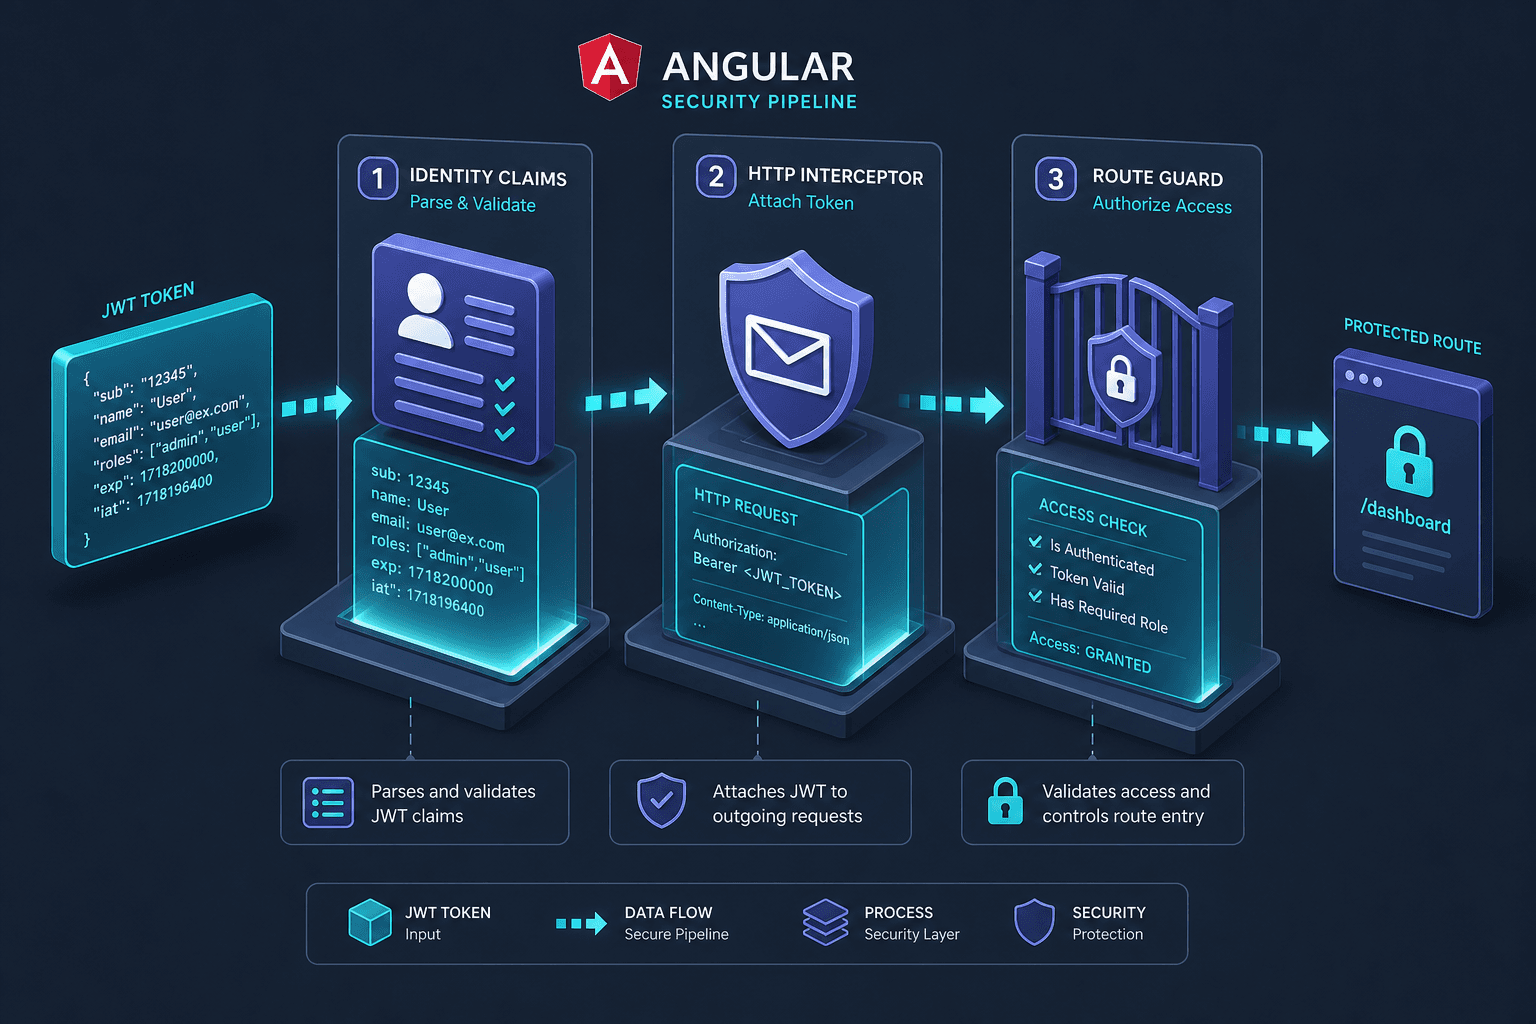
Securing an Angular application with OAuth2 and OpenID Connect (OIDC) is often misunderstood as a binary state: you either have a token or you don’t. In production environments, this view is dangerously incomplete. Security is not a single component; it is a layered pipeline where the token serves as the raw material, and three distinct mechanisms process it: Identity Claims define who the user is, HTTP Interceptors ensure the token travels securely to backends, and Route Guards enforce what the user can see in the UI.
This article details the mechanism-level interaction of these three components within the angular-oauth2-oidc ecosystem. We will move beyond simple login flows to examine how to parse JWT claims, attach tokens to requests, and restrict navigation based on identity.
The Foundation: Identity Claims
Before a route can be guarded or a request intercepted, the application must understand the user's identity. In OIDC, this identity is encoded in the id_token, which is a JSON Web Token (JWT).
The mechanism here is parsing. When angular-oauth2-oidc completes the authorization code flow, it receives the id_token. This token is not just a random string; it is a signed JSON object containing standard claims (sub, iss, exp) and potentially custom claims (e.g., roles, permissions). Managing identity claims angular requires careful parsing of the JWT payload to extract these attributes reliably.
// Pseudocode: Extracting claims from the parsed result
const parsedResult = this.oauthService.parseHashIntoToken();
const claims = this.oauthService.getIdentityClaims();

// 'claims' is now a JSON object containing user attributes
if (claims['roles']?.includes('ADMIN')) {
  // Grant access
}
Why this matters: The claims are the source of truth for authorization decisions. If your backend requires a specific role for an API endpoint, the frontend must already possess and understand that claim. Without parsing the JWT, the application is blind to the user's permissions, relying solely on authentication (presence of a token) rather than authorization (validity of rights).
Opinion: Do not store the raw JWT in local storage if you can avoid it. Use
sessionStorageor memory storage. The security benefit is marginal against XSS, but it prevents accidental persistence across sessions.
Transport Security: HTTP Interceptors
Having a token is useless if it doesn't reach the backend. HTTP Interceptors in Angular provide a global mechanism to modify outgoing HTTP requests. In the context of OIDC, the primary job of the interceptor is to attach the access token to the Authorization header. Configuring an http interceptor angular module allows global request modification, ensuring consistent security headers across all API calls without duplicating code in every service.
The mechanism involves three steps:
- Check: Does the request need authentication? (Skip public assets like images or CSS).
- Retrieve: Get the current access token from
OAuthService. - Attach: Modify the request headers to include
Authorization: Bearer <token>.
Crucially, the interceptor must handle token expiration. If the access token is expired, the interceptor should trigger a silent refresh (using the refresh token) before attaching the new token.
import { HttpInterceptor, HttpRequest, HttpHandler, HttpEvent } from '@angular/common/http';
import { Observable } from 'rxjs';
import { OAuthService } from 'angular-oauth2-oidc';
import { Injectable } from '@angular/core';

@Injectable()
export class AuthInterceptor implements HttpInterceptor {
  constructor(private oauthService: OAuthService) {}

  intercept(request: HttpRequest<any>, next: HttpHandler): Observable<HttpEvent<any>> {
    // Skip non-API requests
    if (!request.url.includes('/api/')) {
      return next.handle(request);
    }

    const accessToken = this.oauthService.getAccessToken();

    if (accessToken) {
      // Clone the request and add the Authorization header
      const authRequest = request.clone({
        setHeaders: {
          Authorization: `Bearer ${accessToken}`
        }
      });
      return next.handle(authRequest);
    }

    // If no token, proceed without it (or handle error depending on policy)
    return next.handle(request);
  }
}
Mechanism Detail: The interceptor operates at the transport layer. It ensures that every API call is authenticated. However, it does not make decisions about whether the user should be allowed to make the call; it only ensures the call is authenticated. That decision belongs to the Route Guard.
Access Control: Route Guards
Route Guards in Angular are functions that determine if a route can be activated. They are the gatekeepers of the UI. While the HTTP Interceptor handles backend security, the Route Guard handles frontend security. A route guard angular implementation typically uses CanActivate to evaluate user state before component initialization.
The most common guard is CanActivate. The mechanism here is synchronous or asynchronous evaluation of the user's state before the component is instantiated.
import { Injectable } from '@angular/core';
import { CanActivate, Router, ActivatedRouteSnapshot, RouterStateSnapshot } from '@angular/router';
import { OAuthService } from 'angular-oauth2-oidc';

@Injectable({
  providedIn: 'root'
})
export class AdminGuard implements CanActivate {
  constructor(private oauthService: OAuthService, private router: Router) {}

  canActivate(
    route: ActivatedRouteSnapshot,
    state: RouterStateSnapshot
  ): boolean {
    const claims = this.oauthService.getIdentityClaims();

    // Check if user has 'ADMIN' role in their claims
    const hasAdminRole = claims?.['roles']?.includes('ADMIN');

    if (!hasAdminRole) {
      // Redirect to home or unauthorized page
      this.router.navigate(['/']);
      return false;
    }

    return true;
  }
}
Key Distinction: Authentication vs. Authorization.
- Authentication (handled by
angular-oauth2-oidcinitialization): "Is the user logged in?" - Authorization (handled by Route Guards): "Does the logged-in user have the required claim?"
If you only check for the presence of an access token in the guard, you are only authenticating. To truly secure routes, you must validate the claims extracted from the id_token.
Integration: A Worked Scenario
Let’s trace a single user action to see how these three mechanisms interact.
Scenario: Alice, who has the role EDITOR, tries to navigate to /admin/dashboard.
- Navigation Trigger: Alice clicks a link to
/admin/dashboard. - Route Guard Activation: The Angular Router activates
AdminGuard. - Claim Verification:
AdminGuardcallsoauthService.getIdentityClaims(). It checks ifrolesincludesADMIN. - Decision: Alice has
EDITOR, notADMIN. The guard returnsfalseand redirects Alice to/home. - Result: The
/admin/dashboardcomponent is never instantiated. No HTTP request is made. The UI remains secure because the frontend prevented the navigation.
Contrast with a successful scenario:
If Alice were an ADMIN:
- Guard returns
true. - Component initializes.
- Component calls an API:
http.get('/api/admin/users'). - HTTP Interceptor Triggers: The interceptor sees the
/api/URL. - It retrieves Alice’s valid access token.
- It clones the request and adds
Authorization: Bearer <token>. - The request is sent to the backend.
- Backend validates the token signature and claims.
Conclusion
Securing an Angular application with OIDC requires a holistic view. The id_token provides the claims (Identity), the HTTP Interceptor ensures these claims are sent to the backend (Transport), and the Route Guard ensures the UI respects those claims (Access Control).
Neglecting any layer creates a vulnerability:
- No Interceptor: Tokens are not sent, APIs reject requests (but UI may still expose sensitive data).
- No Guard: Users can manipulate the browser URL to access routes they shouldn't see (though API calls will fail, this is a poor UX and potential information leak).
- No Claim Parsing: You cannot distinguish between users with different roles, leading to over-privileged access.
By implementing all three, you create a defense-in-depth strategy that aligns with modern security best practices. This layered approach to angular security ensures robust protection against both client-side and server-side vulnerabilities. For authoritative guidance on implementing secure authentication flows, refer to the Angular Documentation on HTTP Interceptors and the OAuth 2.0 RFC 6749 specifications regarding token handling.
Common Pitfalls
- Storing tokens in localStorage: Avoid storing sensitive tokens in
localStorageas they are accessible via JavaScript, increasing XSS risk. PrefersessionStorageor in-memory storage. - Skipping token expiration checks in interceptors: Failing to check token expiration before attaching it to a request can lead to failed API calls. Always validate
expclaims or handle silent refreshes gracefully. - Using only authentication (presence of token) instead of authorization (claims) in guards: Checking only if a token exists grants access to any authenticated user. Always validate specific claims (e.g., roles) to enforce proper authorization.
Practical Takeaways
- Identity is defined by claims, not just tokens: A token is merely a carrier; the claims inside it define the user's permissions and identity.
- Interceptors handle transport, not decisions: HTTP Interceptors ensure requests are authenticated but do not decide if a user should make the request.
- Guards protect the UI, not the API: Route Guards prevent unauthorized UI rendering but must be complemented by backend validation for true security.
FAQ
How do I handle token refresh in an interceptor? Implement logic in the interceptor to catch 401 Unauthorized responses. If a token is expired or invalid, trigger a silent refresh using the refresh token before retrying the original request.
What is the difference between authentication and authorization in Angular? Authentication verifies who the user is (via the OAuth2/OIDC flow and token validation), while authorization determines what they can do (via Route Guards checking claims).
Can I use route guards for API protection? No. Route Guards only control client-side navigation. They do not protect the API endpoints themselves. You must always validate permissions on the server side as well.
Related posts
Angular OAuth2 Logout: revokeTokenAndLogout & Backchannel
Implement secure logout in Angular using revokeTokenAndLogout, session checks, and backchannel protocols to ensure complete session termination.
Angular OAuth2/OIDC Token Storage: localStorage, sessionStorage, and In-Memory
Compare localStorage, sessionStorage, and in-memory storage for Angular OAuth2 OIDC tokens to mitigate XSS risks and secure authentication.
OAuth 2.0 Refresh Tokens in Angular: Silent Refresh with useRefreshTokens
Learn how to implement automatic silent refresh in Angular using userefreshtoken and setupautomaticsilentrefresh for secure session management.