Keycloak SPI Development: Building Custom Providers
Learn to build custom Keycloak providers using the Service Provider Interface for enhanced extensibility and plugin development.
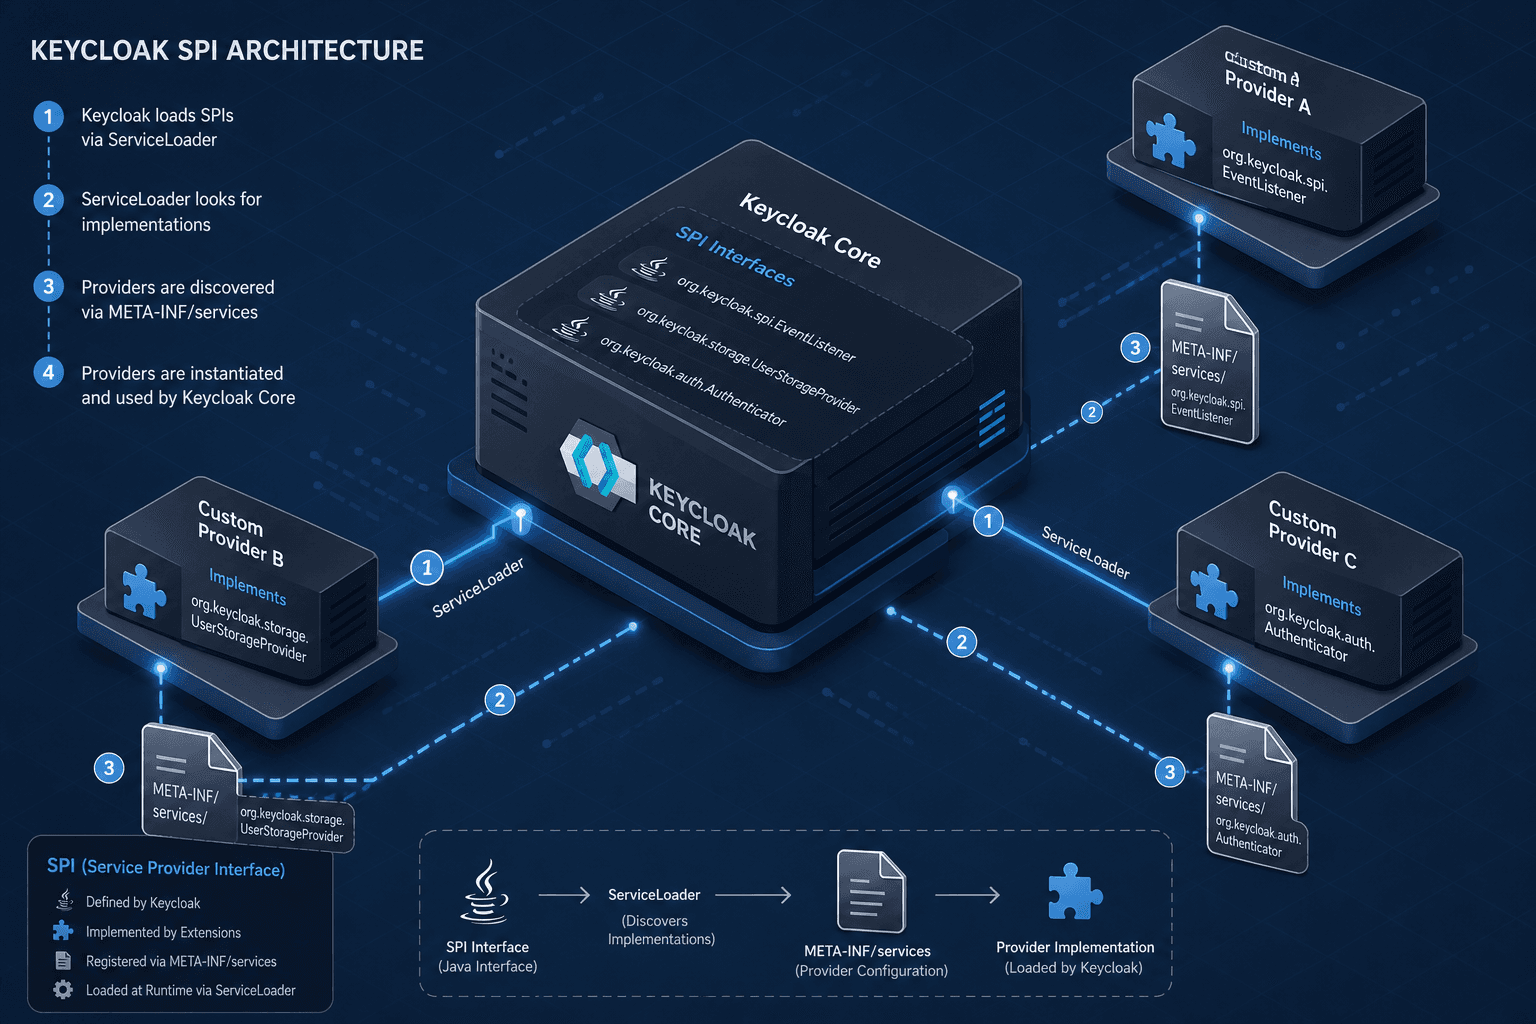
To extend Keycloak beyond its default capabilities, you must understand that it does not rely on a traditional plugin system with hot-swapping jars. Instead, it uses a strict Service Provider Interface (SPI) based on the Java ServiceLoader pattern. This guide covers building custom providers within Keycloak using the SPI architecture to extend functionality and create effective plugins. When you build a custom provider, you are not writing a "plugin" in the loose sense; you are implementing a specific Java interface that the Keycloak core expects to find in a specific file location during the bootstrap phase.
The Discovery Mechanism
The mechanism begins with the ProviderFactory interface. This is the base contract Keycloak enforces. Every extension point—whether it is a custom authentication flow, a user storage provider, or a message sender—requires a factory class. The core of this system lies in how Keycloak locates these factories. It does not scan the classpath dynamically. Instead, during the server startup, the ProviderManager initializes a ServiceLoader. This loader looks specifically for files located in the META-INF/services/ directory of your JAR or WAR artifact. These files are named after the fully qualified interface you are implementing.
Consider the file META-INF/services/org.keycloak.provider.ProviderFactory. If your custom factory class is com.example.auth.OAuth2TokenAuthenticatorFactory, you must place a text file named org.keycloak.provider.ProviderFactory containing the string com.example.auth.OAuth2TokenAuthenticatorFactory inside your artifact's resources. When Keycloak starts, the ServiceLoader reads this file, loads the class, and instantiates it. This is the moment your code enters the Keycloak ecosystem. If this file is missing or the class name is incorrect, the provider simply does not exist to the runtime, regardless of how many dependencies you compile.
Specific extensions often implement interfaces that extend ProviderFactory. For instance, an authenticator factory implements AuthenticatorFactory, which extends ProviderFactory. This hierarchy ensures that while the discovery mechanism remains consistent, the specific lifecycle methods available to the factory depend on the type of provider being created.
The Lifecycle and Instantiation
Once the ProviderFactory is instantiated, the lifecycle moves to the create() method. This method is called once per provider instance during the initialization of a specific Keycloak server node. Inside create(), you receive a KeycloakSession object. This session is critical because it holds the reference to the KeycloakSession. You cannot create your own EntityManager or DataSource directly. You must extract the necessary resources from the session provided by the context. This design ensures that your provider respects the transactional boundaries and resource pools managed by the underlying application server (WildFly or Quarkus).
For example, if you need to query the database, you do not call EntityManagerFactory.createEntityManager(). Instead, you call context.getSession().getProvider(JpaProvider.class) or access the transaction manager via the session. This dependency injection model prevents state leakage. In a clustered environment, Keycloak distributes sessions across nodes. If your provider holds state in instance variables (like a private String cache), you risk data inconsistency. The ProviderFactory must be stateless. All mutable state must be stored in the database or retrieved from the session context during the execution of the provider's logic.
Dependency Injection and Context
KeycloakSession allows providers to access the database (EntityManager) and configuration properties without hardcoding lookups. The KeycloakSession is the handle to the entire Keycloak context for the current request.
Let us construct a concrete scenario: an "OAuth2 Bearer Token Validator." We need a provider that allows Keycloak to accept an access token issued by an external Identity Provider (like Auth0 or Azure AD) as a valid login credential. We will implement the AuthenticatorFactory interface. This interface requires two main methods: create() and getId(), along with configuration handling.
First, define the factory class structure. It must implement AuthenticatorFactory directly. The class must also implement ConfigurableAuthenticatorFactory if we want to allow configuration via the Admin Console.
package com.example.auth;

import org.keycloak.Config.Scope;
import org.keycloak.models.KeycloakSession;
import org.keycloak.protocol.authenticator.Authenticator;
import org.keycloak.protocol.authenticator.AuthenticatorFactory;
import org.keycloak.services.managers.AuthenticationManager;

import java.util.Map;

public class OAuth2TokenAuthenticatorFactory implements AuthenticatorFactory {

    private static final String CONFIG_URL = "external.token.url";

    @Override
    public Authenticator create(KeycloakSession session) {
        return new OAuth2TokenAuthenticator(session);
    }

    @Override
    public void init(Scope config) {
        // Initialization logic if needed, typically empty for stateless providers
    }

    @Override
    public void postInit(KeycloakSession session) {
        // Post-initialization logic
    }

    @Override
    public void close() {
        // Cleanup resources
    }

    @Override
    public String getId() {
        return "oauth2-token-authenticator";
    }

    @Override
    public String getDisplayType() {
        return "OAuth2 Token";
    }

    @Override
    public String getReferenceCategory() {
        return "OAuth2";
    }

    @Override
    public boolean isConfigurable() {
        return true;
    }

    @Override
    public Map<String, String> getConfigProperties() {
        return null; // Define properties if needed
    }
}
The critical part is the create method. Here, we instantiate our actual provider logic. Notice that we pass the KeycloakSession to our constructor. This session is the handle to the entire Keycloak context for the current request.
Now, implement the OAuth2TokenAuthenticator class. This class extends AbstractAuthenticator to leverage built-in helper methods for handling the authentication flow. The performChallenge method is the entry point for the challenge. Keycloak calls this when a user attempts to log in via this flow.
package com.example.auth;

import org.keycloak.models.KeycloakSession;
import org.keycloak.models.RealmModel;
import org.keycloak.models.UserModel;
import org.keycloak.protocol.authenticator.Authenticator;
import org.keycloak.services.managers.AuthenticationManager;
import org.keycloak.services.messages.Messages;

import javax.ws.rs.core.Response;
import javax.ws.rs.core.UriBuilder;

public class OAuth2TokenAuthenticator extends AbstractAuthenticator {

    private final KeycloakSession session;
    private final String externalApiUrl;

    public OAuth2TokenAuthenticator(KeycloakSession session) {
        this.session = session;
        // Retrieve configuration from the context or environment
        this.externalApiUrl = session.getContext().getConfig().get("external.token.url", "");
        // In a real scenario, ensure the config key matches what is defined in the factory
    }

    @Override
    public Response performChallenge(RealmModel realm, AuthenticationManager.AuthResult result,
                             UriBuilder uriBuilder) {
        // For a token-based flow, we usually don't show a challenge UI.
        // We immediately attempt to validate the token sent in the header.
        return null; // Return null to indicate no challenge UI is needed
    }

    @Override
    public Response challenge(RealmModel realm, AuthenticationManager.AuthResult result,
                             UriBuilder uriBuilder) {
        // Standard challenge implementation if needed
        return super.challenge(realm, result, uriBuilder);
    }

    @Override
    public boolean isUserRequired() {
        return false; // We authenticate via token, not existing user credentials initially
    }

    @Override
    public void removeUserFromRealm(RealmModel realm, UserModel user) {
        // Cleanup logic if user is removed
    }

    private Response error(String message) {
        return Response.status(Response.Status.UNAUTHORIZED).entity(message).build();
    }

    private String extractTokenFromRequest() {
        // Parse Authorization header
        return "mock-token";
    }

    private boolean validateExternalToken(String token) {
        // Implementation detail: HTTP client call to external API
        // Return true if 200 OK, false otherwise
        return true;
    }

    private UserModel findOrCreateUser(String token) {
        // Logic to lookup user by sub claim in token
        // If not found, create a new user
        return session.users().getUserByUsername("external-user");
    }
}
The performChallenge method is where the logic diverges from standard username/password flows. Standard flows involve a form submission. Here, we assume the client has already attached the token to the Authorization header. The AuthenticationManager.authenticated call is the mechanism that tells Keycloak, "This user is valid, proceed to the next step in the flow." Note that the signature for authenticated typically takes the session, realm, and user, without the factory instance as the final argument in modern versions.
Configuration and Deployment
The final piece of the puzzle is the spi file. You must ensure your META-INF/services/org.keycloak.provider.ProviderFactory file contains the exact class name of your factory. If you are using Maven or Gradle, you can automate this using the META-INF/services resource directory. If you are building a JAR, the file must be packaged exactly as is.
# META-INF/services/org.keycloak.provider.ProviderFactory
com.example.auth.OAuth2TokenAuthenticatorFactory
When you deploy this JAR to the providers directory of Keycloak (e.g., /opt/keycloak/providers/), the server restarts, the ServiceLoader finds your file, instantiates your factory, and registers it. You can then go to the Admin Console, navigate to Authentication -> Flows, and see "OAuth2 Token Authenticator" as an available option.
This mechanism ensures that Keycloak remains modular. You can swap out the authentication logic without recompiling the core server. The ProviderFactory pattern enforces a strict contract: you provide a factory, Keycloak provides the session and lifecycle. You do not control the startup sequence; you only control the logic executed when your provider is invoked.
Conclusion
Building custom providers is about adhering to the discovery and instantiation rules of the SPI. You must create the factory, implement the interface, register the service file, and manage statelessness through the KeycloakSession. This approach allows you to extend Keycloak's capabilities extensively while maintaining the stability and clusterability of the platform.
The tradeoff here is complexity. You are now responsible for handling edge cases in the authentication flow, such as token expiration, network timeouts to the external API, and user provisioning strategies. However, the mechanism provides a clean separation of concerns. The core Keycloak code never needs to know about your external API; it only knows that your provider implements the Authenticator interface and returns a valid Response. This is the essence of Keycloak extensibility.
FAQ
How do I debug a missing factory?
If your provider does not appear in the Admin Console, check the server logs during startup. Look for messages from ServiceLoader indicating that the class was not found in the META-INF/services file. Ensure the file name matches the fully qualified interface name exactly and that the class name inside the file is spelled correctly.
Can I use Spring in a Keycloak provider?
Yes, but it is generally discouraged due to the complexity of managing the Spring context alongside Keycloak's CDI-based lifecycle. If you must use Spring, you should initialize the Spring context manually within the init() method of your factory, ensuring that the Spring beans are compatible with the Keycloak KeycloakSession.
What is the difference between ProviderFactory and AuthenticatorFactory?
ProviderFactory is the base interface for all Keycloak extensions. AuthenticatorFactory extends ProviderFactory specifically for authentication-related providers. While ProviderFactory defines the basic lifecycle (create, init, close), AuthenticatorFactory adds methods specific to authentication flows, such as isConfigurable() and getReferenceCategory().
Related posts
Keycloak Architecture Deep Dive: Internal Components and Data Flow
An examination of Keycloak architecture, internal components, SPI extensions, themes, and the core data model for advanced developers.
Keycloak Custom Authentication Flows: Building Custom Login Experiences
An examination of Keycloak authentication flows, custom auth strategies, and SPI implementation for building tailored login experiences.
Building Identity-Aware Load Balancing with NGINX and Keycloak
Learn how to implement identity-aware load balancing using NGINX and Keycloak for secure authentication routing.