Securing Keycloak: Hardening Guide for Production
A technical examination of Keycloak security and hardening strategies for production environments, covering brute force mitigation and Content Security Policy implementation.
In a typical development environment, Keycloak is often deployed with a permissive posture: all ports open, CORS allowing any origin, and no account lockout policies. This configuration works until an attacker scans the infrastructure. In a production zero-trust architecture, the identity provider is not just a gatekeeper; it is a high-value target. If an attacker compromises the Keycloak realm, they can impersonate every user and service in your ecosystem. The hardening process requires moving beyond surface-level configuration changes and understanding the underlying mechanisms of how Keycloak handles sessions, how browsers render the login page, and how network traffic flows between the Identity Provider (IdP) and the resource servers.
This guide, Part 1 of the Zero Trust & Modern Security Architecture series, details the specific mechanisms required to shift from a functionality-first default to a defense-in-depth production model.
The Default Attack Surface
When you spin up a fresh Keycloak instance, it listens on port 8080 (or 443 if configured) and exposes the admin console at /admin. By default, the server trusts all incoming connections unless explicitly restricted. The mechanism here is simple: the HTTP listener accepts any request that matched the path, and the authentication filter only triggers when a specific resource requires it.
Consider a scenario where an attacker runs a simple port scan against your cloud instance. They find Keycloak running. Without hardening, they can access the /realms/master/admin endpoint. If the default credentials haven't been changed, they gain administrative access immediately. Even if the password is strong, the lack of a brute force lockout means they can attempt thousands of guesses per second.
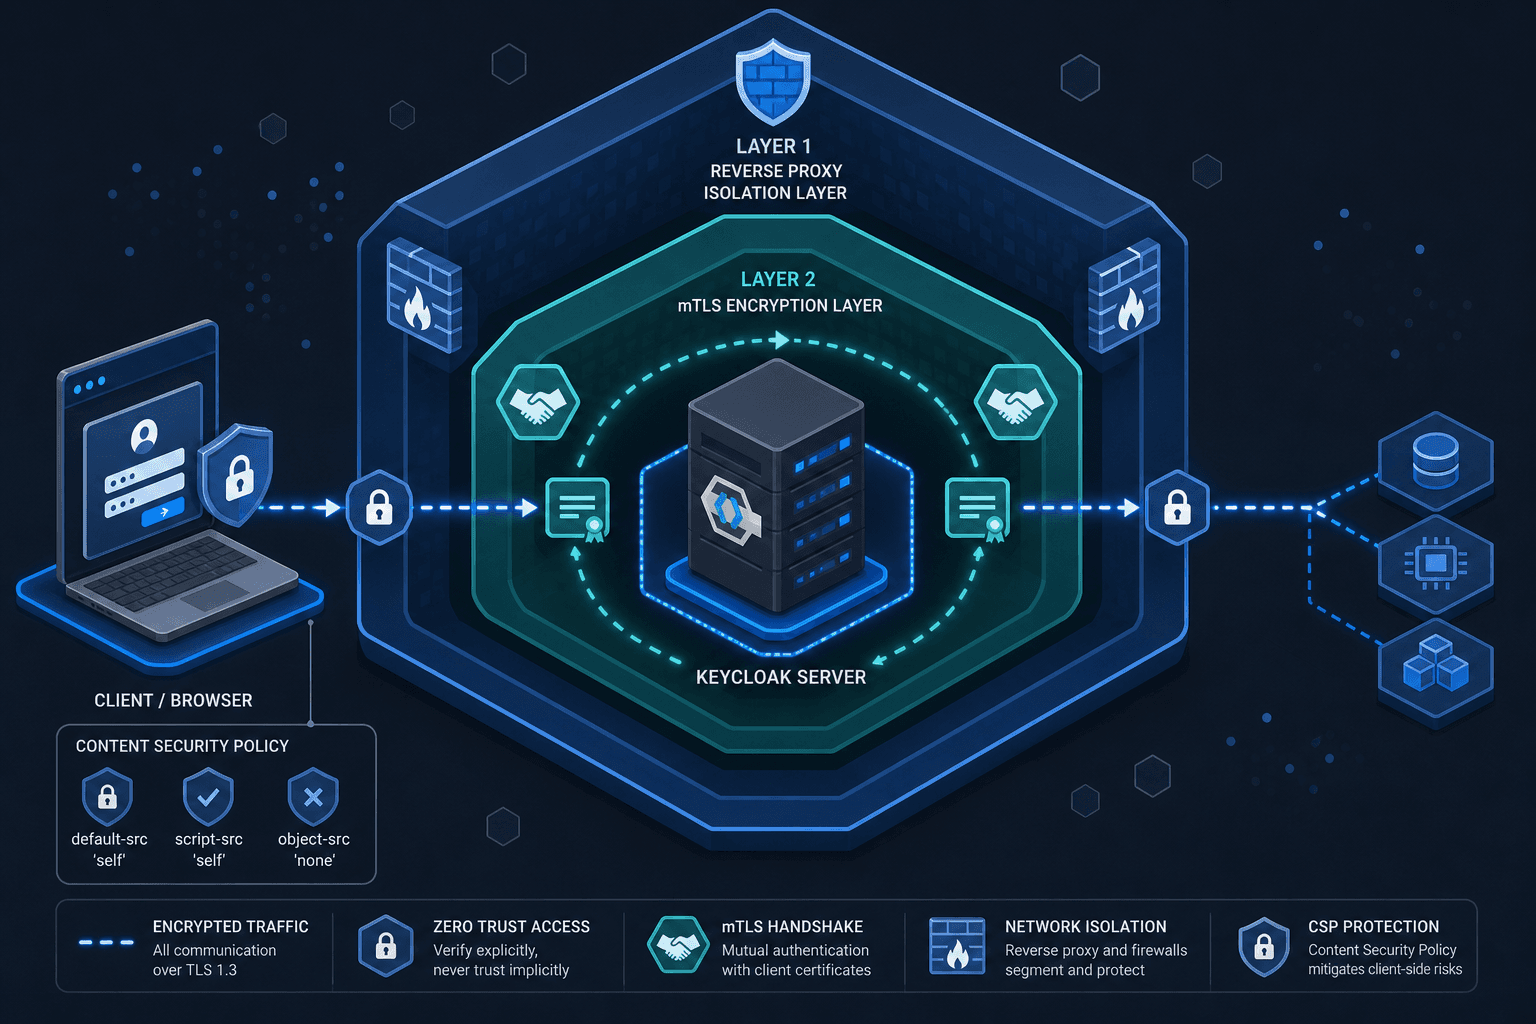
The first line of defense is network isolation. You must never expose the Keycloak port directly to the public internet if a reverse proxy (like Nginx, Traefik, or AWS ALB) is available. The mechanism here is the "bouncer" pattern. The reverse proxy terminates SSL, handles the initial handshake, and forwards traffic to Keycloak over a private network interface. This prevents attackers from seeing the raw TCP handshake and limits their ability to perform volumetric attacks directly against the Java process.
Mechanisms of Brute Force Mitigation
The most common attack vector against identity providers is credential stuffing or brute force attacks. Keycloak handles this via the Brute Force provider mechanism, which operates at the realm level rather than the individual user level. This is a critical distinction: the server tracks failed attempts globally or per-user and enforces a stateful lockout.
By default, Keycloak allows unlimited attempts. To secure this, you must configure the brute-force settings in the realm via the Admin REST API. The mechanism works by maintaining a counter in the server's memory (or database, depending on the cache configuration) for each username or IP address. Once the threshold is crossed, the server enters a "lockout" state where it actively rejects further authentication requests for that specific identifier.
Here is how you configure this using the Admin REST API in a production realm.
# Example REST API call to enable brute force protection
curl -X PUT "http://localhost:8080/admin/realms/production/settings" \
  -H "Authorization: Bearer $ADMIN_TOKEN" \
  -H "Content-Type: application/json" \
  -d '{
    "bruteForceProtected": true,
    "bruteForceStrategy": "USER",
    "waitIncrementMillis": 30000,
    "minimumQuickLoginWaitMillis": 30000,
    "maxFailureWaitMillis": 900000,
    "maxNotUseQuickLoginWaitMillis": 900000,
    "quickLoginCheckMilliSeconds": 1000,
    "failureResetTime": 900000,
    "maxFailureWaitMillis": 900000,
    "notAllowedQuickLoginCheckMilliSeconds": 1000,
    "maxLoginFailures": 10
  }'
Let's trace the mechanism with a named actor, Bob, who is trying to log in.
- Attempt 1: Bob enters the wrong password. The server increments his failure counter to 1.
- Attempt 11: Bob tries again. The counter hits the
maxLoginFailures(10). - Lockout: The server immediately begins the lockout period. Any subsequent request from Bob's IP or username within the
waitIncrementMillis(30 seconds) is actively rejected with a generic "Login failed" message. - Reset: The server waits for the
failureResetTime(15 minutes) before resetting the counter to zero, allowing new attempts.
This mechanism prevents attackers from guessing passwords rapidly. However, it introduces a Denial of Service (DoS) risk if an attacker floods the server with fake usernames. To mitigate this, you must combine the server-side lockout with IP-based rate limiting at the reverse proxy level. The proxy drops packets from an IP that exceeds a request-per-second limit before they even reach the Keycloak Java process.
Content Security Policy (CSP) Implementation
While network and authentication controls protect the backend, the frontend—specifically the Admin Console and the Login Page—remains vulnerable to Cross-Site Scripting (XSS). In a zero-trust model, we assume the browser might be compromised or the network might be untrusted. The mechanism to defend against this is the Content Security Policy (CSP).
CSP works by instructing the browser's rendering engine to only execute scripts, load images, or connect to endpoints that are explicitly whitelisted. If an attacker manages to inject a malicious script tag into the login page (e.g., via a compromised theme or a subdomain takeover), a strict CSP will cause the browser to block that script from executing.
Keycloak does not support injecting custom HTTP headers like CSP via the KEYCLOAK_HTTP_RELATIVE_PATH variable, which controls only the URI path prefix. The correct mechanism is to enforce CSP at the reverse proxy layer or by implementing a custom filter within the container image to add the header before the response leaves your infrastructure.
For a production environment, you should implement a strict CSP that disables inline scripts (unsafe-inline) and only allows resources from trusted origins.
Content-Security-Policy: default-src 'self'; script-src 'self'; style-src 'self' 'unsafe-inline'; img-src 'self' data:; font-src 'self'; connect-src 'self'; frame-src 'none';Consider the scenario where an attacker manages to inject a script that steals the JWT token from the browser's local storage. Without CSP, the browser executes the script, sends the token to the attacker's server, and the session is hijacked. With the strict CSP header defined above, the browser sees the script-src 'self' directive. Since the malicious script is hosted on evil.com, the browser refuses to load it, and the injection fails.
It is crucial to test this policy thoroughly. Keycloak themes often rely on inline styles or dynamic script loading for things like the password strength meter. You may need to whitelist specific nonces or hashes if you cannot move the logic to external files.
Zero Trust and Network Hardening
The final layer of hardening involves the communication between Keycloak and the rest of your infrastructure. In a zero-trust architecture, no service trusts another by default. This means the traffic flowing between your application and Keycloak must be authenticated and encrypted, even if it stays within the same data center.
The mechanism here is Mutual TLS (mTLS). Instead of relying on the application layer to validate tokens, you enforce certificate validation at the transport layer. Keycloak can be configured to require clients to present a valid X.509 certificate to connect to the /realms endpoints.
To achieve this, you configure your reverse proxy or service mesh (like Istio or Linkerd) to terminate mTLS. The proxy verifies the client certificate, and only then forwards the request to Keycloak. This ensures that even if an attacker intercepts the traffic, they cannot impersonate a valid service without the private key.
Additionally, you must restrict access to the Admin Console. The mechanism is simple: the reverse proxy checks the source IP of the request. If the IP is not in the list of trusted administrative networks (e.g., your CI/CD runner or your internal ops team's bastion host), the proxy returns a 403 Forbidden response immediately.
# Nginx configuration snippet for Admin Console restriction
location /admin {
    allow 10.0.0.0/8; # Internal network
    allow 192.168.1.10; # Specific bastion host
    deny all;

    proxy_pass http://keycloak:8080;
}
This approach ensures that the administrative interface is never exposed to the public internet, reducing the attack surface significantly.
Common Pitfalls
When implementing these hardening measures, several common mistakes can undermine security or cause operational outages.
- Misconfiguring mTLS: Forcing mTLS without distributing the correct CA certificates to all internal services will break communication. Always test the certificate chain in a staging environment before enforcing it in production.
- Ignoring Reverse Proxy Rate Limiting: Relying solely on Keycloak's internal brute force protection is insufficient against volumetric attacks. Without upstream rate limiting, the Keycloak server can still be overwhelmed, leading to legitimate users being locked out or service degradation.
- Overly Restrictive CSP: Implementing a CSP without testing against your specific Keycloak theme can break functionality. Features like the password strength meter or dynamic form rendering often require specific script execution contexts. Failing to whitelist necessary nonces or domains can lock administrators out of the console.
Practical Takeaways
To effectively secure Keycloak, adopt these mental models during the hardening process:
- Defense in Depth: No single configuration change is sufficient. Combine network isolation, application-level logic (like brute force lockouts), and browser-level policies (CSP) to create overlapping layers of security.
- Assume Breach: Operate under the assumption that the network is hostile. Encrypt all traffic (mTLS) and verify identities at every hop, not just at the perimeter.
- Principle of Least Privilege: Restrict the Admin Console to specific IPs and limit the scope of roles assigned to service accounts. Minimize the blast radius if a credential is compromised.
FAQ
Q: Can I use the Keycloak CLI to enable brute force protection?
A: No, the standard kc.sh CLI does not support direct brute force configuration flags in the way described in older documentation. You must use the Admin REST API (PUT /admin/realms/{realm}/settings) or the Admin Console UI to configure these settings.
Q: Does changing the KEYCLOAK_HTTP_RELATIVE_PATH help with security headers?
A: No, this environment variable only modifies the base URI path for Keycloak. To inject security headers like CSP, you must configure your reverse proxy (Nginx, Traefik, etc.) or implement a custom SPI filter within the Keycloak container.
Q: What happens if I lock out an attacker's IP but not their username? A: If you configure the brute force strategy to track by IP, you mitigate DoS attempts effectively. However, if the attacker rotates IPs, they may bypass IP-based limits. A robust strategy often combines IP rate limiting at the proxy level with user-based lockouts at the Keycloak level.
Conclusion
Securing Keycloak in production is not about enabling a single "secure mode" toggle. It is a layered approach that combines network isolation, server-side brute force logic, browser-level content policies, and mutual TLS for service-to-service communication. By understanding the mechanisms behind these configurations—how the server tracks failed attempts, how the browser interprets CSP headers, and how mTLS validates identities—you can build a defense system that withstands sophisticated attacks. The goal is to make the cost of an attack higher than the value of the data, effectively neutralizing the threat before it reaches the application logic.
The tradeoff here is complexity. Enforcing strict CSP and mTLS requires careful configuration and testing. However, in a zero-trust environment, the cost of a breach far outweighs the effort of hardening. Security is a continuous process, not a one-time configuration.
Related posts
Building Identity-Aware Load Balancing with NGINX and Keycloak
Learn how to implement identity-aware load balancing using NGINX and Keycloak for secure authentication routing.
Implementing WebAuthn in Keycloak: Passkey Authentication Setup
A walkthrough for configuring WebAuthn and passkeys within Keycloak to enable passwordless authentication using FIDO2 standards.
Building a Self-Service Password Reset with Spring Boot and Keycloak
A walkthrough of implementing password recovery and self-service identity flows using Spring Boot and Keycloak required actions.