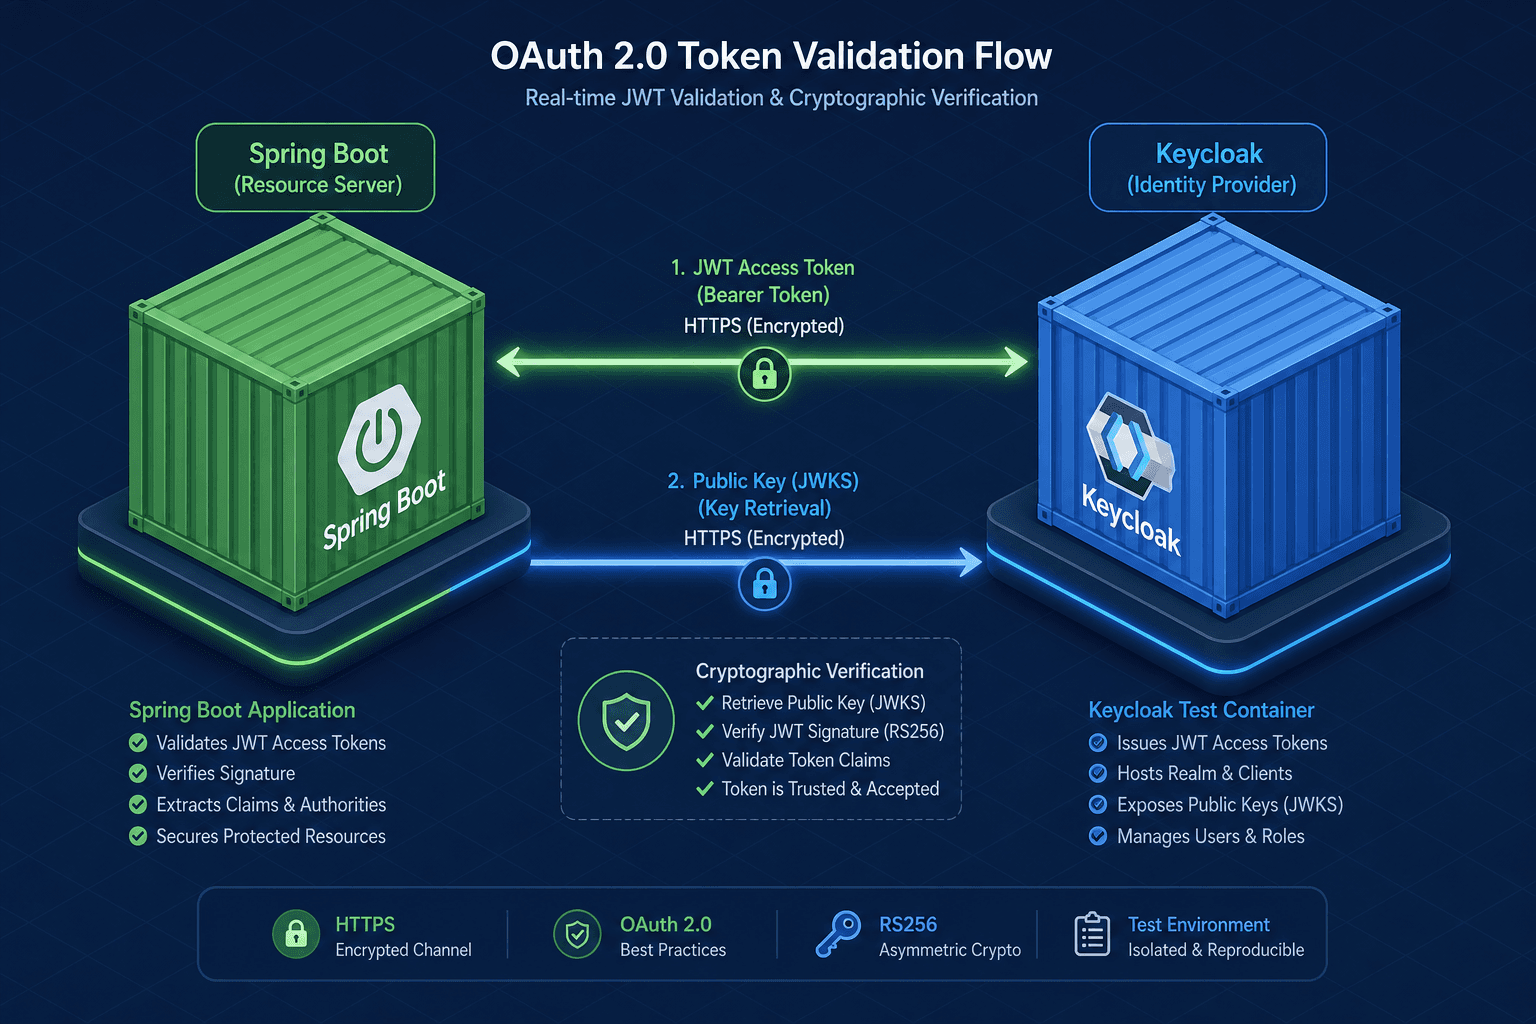
Testing OAuth 2.0 Implementations: A Developer's Guide
A developer's guide to testing OAuth 2.0 implementations using Spring Boot, Keycloak test containers, and API security testing techniques.
Most developers approach OAuth 2.0 testing by mocking the Identity Provider (IdP), writing mock servers that return pre-signed JSON Web Tokens (JWT) or stubbing HTTP responses. This approach fails to catch critical integration bugs because it bypasses the cryptographic verification that actually secures the application. To test correctly, you need a mechanism that forces the application to perform real cryptographic operations, such as validating the iss (issuer) claim and verifying the JWS/JWT signature against the IdP's public key.
This guide demonstrates how to spin up a real OAuth 2.0 server inside a Docker container using Keycloak Test Containers. This setup shares the same network namespace as your Spring Boot application, providing a realistic environment where the resource server can fetch real public keys, validate real signatures, and observe real token expiration behaviors. As Part 10 of the OAuth 2.0 Deep Dive Series, we move beyond simple token assertions to verify the entire chain of trust.
The Architecture of a Real Test Environment
In a standard unit test, your AuthService (the Resource Server) talks to a fake AuthService. In this integration test, AuthService talks to a KeycloakContainer. The container starts a fresh instance of Keycloak, creates a specific realm named test-realm, and provisions a client named my-app with the secret test-secret.
The container exposes a set of dynamic endpoints: http://localhost:<port>/realms/test-realm/protocol/open-connect/token. Your test must not hardcode these URLs. Instead, it must query the container to discover the authorization and token endpoints at runtime. This ensures that if the container binds to a different port, the test still works.
Here is how you initialize the Keycloak container in your Spring Boot test class using the testcontainers library. Note that the standard KeycloakContainer does not support withRealmImportFile directly. We use the start-dev mode and provision the realm via the Admin REST API to ensure the configuration is applied dynamically.
@Testcontainers
@SpringBootTest(webEnvironment = SpringBootTest.WebEnvironment.RANDOM_PORT)
public class OAuth2IntegrationTest {

    @Container
    static KeycloakContainer keycloakContainer = new KeycloakContainer("quay.io/keycloak/keycloak:latest start-dev")
        .withStartupTimeout(Duration.ofMinutes(5));

    @Value("${spring.security.oauth2.client.provider.keycloak.issuer-uri}")
    private String issuerUri;

    @Autowired
    private WebClient webClient;

    @BeforeEach
    void setupRealm() throws IOException {
        // Provision realm and client via Admin API
        String adminToken = keycloakContainer.getAdminToken();
        // Logic to create 'test-realm' and 'my-app' client via REST API would go here
        // Example: post to /admin/realms with realm config
    }

    @Test
    void shouldValidateRealTokenSignature() throws Exception {
        // Test logic follows
    }
}
The realm configuration is now provisioned programmatically or via the Admin REST API during the test setup. This defines the user credentials (test-user / password123) and the client settings. By provisioning this configuration at runtime, we ensure the container is in a known state, identical to a production environment but isolated from the internet.
Executing the Authorization Code Flow
Now we move to the mechanism of the flow itself. We need to simulate a user logging in. The Authorization Code flow involves several HTTP redirects. In a test, we cannot rely on a browser, so we use RestTemplate or WebClient to handle the redirects and extract the authorization code.
First, we construct the authorization request. The state parameter is crucial here; it is a random string generated by the client to prevent Cross-Site Request Forgery (CSRF). If the callback URL does not return the exact same state value, the resource server must reject the request. This is a mechanism-level check that mocks often skip.
@Test
void shouldRejectMissingStateParameter() {
    // Construct URL without 'state' parameter
    String authUrl = String.format(
        "%s/protocol/openid-connect/auth?client_id=my-app&redirect_uri=http://localhost:%d/callback&response_type=code",
        keycloakContainer.getAuthServerUrl(), serverPort
    );

    // Trigger the redirect. The test framework follows redirects.
    // When the callback happens, the 'state' parameter will be missing.
    // The Spring Security filter chain should detect this and throw an exception.
    // We assert that the request is rejected.
}
Next, we exchange the authorization code for an access token. This is where the client_secret is sent to the token endpoint. The container validates this secret. If the secret is wrong, the container returns an HTTP 400 with error=invalid_client. Your application must handle this specific error code and not attempt to proceed with a null token.
@Test
void shouldRejectInvalidClientSecret() {
    // Prepare token request with wrong secret
    MultiValueMap<String, String> params = new LinkedMultiValueMap<>();
    params.add("grant_type", "authorization_code");
    params.add("code", "fake-code");
    params.add("client_id", "my-app");
    params.add("client_secret", "wrong-secret"); // Intentional error
    params.add("redirect_uri", "http://localhost:" + serverPort + "/callback");

    // Send request to Keycloak container
    ResponseEntity<TokenResponse> response = webClient.post()
        .uri(keycloakContainer.getAuthServerUrl() + "/protocol/openid-connect/token")
        .bodyValue(params)
        .retrieve()
        .toEntity(TokenResponse.class)
        .block();

    // Assert the container rejects the request
    assertEquals(HttpStatus.BAD_REQUEST, response.getStatusCode());
    assertEquals("invalid_client", response.getBody().getError());
}
Verifying Token Validation on the Resource Server
Once we have a valid token from the container, we must verify that AuthService actually uses it to protect a resource. We send the access token in the Authorization header of a request to a protected endpoint.
The mechanism here is the JwtAuthenticationConverter and JwtDecoder in Spring Security. When the request arrives, the application fetches the public key from the container's JWKS endpoint (.../protocol/openid-connect/certs). It then attempts to verify the JWT signature using this key. If the signature does not match, the request is rejected.
@Test
void shouldAcceptValidTokenFromContainer() throws Exception {
    // 1. Get a valid token first (simplified for brevity)
    String accessToken = getValidAccessToken();

    // 2. Call the protected resource
    ResponseEntity<String> response = webClient.get()
        .uri("/api/protected/resource")
        .header("Authorization", "Bearer " + accessToken)
        .retrieve()
        .toEntity(String.class)
        .block();

    // 3. Assert success
    assertEquals(HttpStatus.OK, response.getStatusCode());
}
If we then tamper with the token payload (e.g., changing the user_id claim) or change the signature, the JwtDecoder will throw an InvalidTokenException. The test should catch this exception or assert that the resource server returns 401 Unauthorized. This confirms that the application is not blindly trusting the token but is actively verifying its integrity.
Testing Edge Cases and Error Handling
A robust test suite must also cover the "unhappy path." OAuth 2.0 defines several error codes. We need to ensure our application handles them gracefully rather than crashing or leaking information.
For example, test the invalid_scope error. If the user requests a token for read:profile but the application requires write:profile, the token will lack the necessary scope. When the resource server checks the scope, it should reject the request.
@Test
void shouldRejectRequestWithInsufficientScope() throws Exception {
    // Request a token with only 'read' scope
    String tokenWithReadScope = getAccessTokenWithScope("read:profile");

    // Attempt to access a resource requiring 'write' scope
    ResponseEntity<String> response = webClient.post()
        .uri("/api/protected/write")
        .header("Authorization", "Bearer " + tokenWithReadScope)
        .retrieve()
        .toEntity(String.class)
        .onErrorReturn(ResponseEntity.class, ResponseEntity.status(HttpStatus.FORBIDDEN))
        .block();

    assertEquals(HttpStatus.FORBIDDEN, response.getStatusCode());
}
Another critical edge case is token expiration. We can configure the Keycloak container to issue tokens with a very short lifetime (e.g., 1 second). We then wait for the token to expire and attempt to use it again. The resource server must detect the exp (expiration) claim is in the past and return 401 Unauthorized. This validates that the JwtDecoder is checking the timestamp and not just the signature.
Finally, consider the invalid_grant error. If the authorization code is used twice, the second use should fail. This ensures the IdP enforces one-time use of codes, a security feature that prevents replay attacks.
Common Pitfalls
When implementing these tests, developers frequently encounter specific issues that undermine the validity of the test suite.
- Hardcoding Endpoint URLs: As mentioned in the architecture section, hardcoding
http://localhost:8080or similar ports breaks the test when the container binds to a random port. Always usekeycloakContainer.getAuthServerUrl()orgetRealmUrl()to retrieve the dynamic endpoint. - Ignoring Clock Skew: OAuth 2.0 relies heavily on time-based claims like
iat(issued at) andexp(expiration). If the system clock of the container differs significantly from the host machine (even by a few seconds), token validation may fail with401 Unauthorized. Ensure the test environment accounts for a clock skew tolerance (typically 60 seconds) in theJwtDecoderconfiguration. - Mocking Tokens Instead of Validating: Creating a JWT manually and signing it with a hardcoded key defeats the purpose of the test. The test must verify that the application can fetch the public key from the IdP and verify the signature of a token issued by that specific IdP instance.
Practical Takeaways
- Real Cryptography: Use test containers to force the application to perform real RSA or ECDSA signature verification, catching configuration errors that mocks miss.
- Dynamic Discovery: Always query the container for endpoints at runtime to ensure portability and resilience to network changes.
- End-to-End Validation: Test the full flow from code exchange to resource access, ensuring that
stateparameters, scopes, and expiration times are enforced by the actual Spring Security filters.
FAQ
Q: Do I need a separate Keycloak instance for every test?
A: No. You can reuse a single KeycloakContainer instance for the entire test suite. However, you must ensure that the realm and client are reset or cleaned up between tests to avoid state pollution, or use distinct realms for parallel test execution.
Q: How do I handle token expiration in long-running integration tests?
A: Configure the realm to issue short-lived access tokens (e.g., 1 minute) and refresh tokens. In your test logic, implement a retry mechanism that detects 401 Unauthorized due to expiration and automatically exchanges a refresh token for a new access token before retrying the request.
Q: Can I test the Authorization Code flow without a browser?
A: Yes. The test uses WebClient or RestTemplate to follow HTTP redirects. You must manually implement the logic to capture the code parameter from the redirect URI query string, simulating what a browser would do after the user authenticates.
Conclusion
Testing OAuth 2.0 is not about asserting that a string looks like a JWT. It is about verifying the entire chain of trust: the IdP issuing a signed token, the client exchanging a code for that token, and the resource server validating the signature and claims against the IdP's public keys. By using Keycloak Test Containers, you force your application to interact with a real cryptographic stack. This eliminates the "it works on my machine" syndrome where the mock server returns a perfect token, but the production server fails because of a key rotation or a misconfigured issuer URI.
This approach shifts the testing focus from "did I get a token?" to "is the security mechanism working?". It is the only way to be confident that your OAuth 2.0 implementation is secure against real-world attacks, not just against a well-behaved mock server. While this adds a slight overhead to your CI/CD pipeline due to container startup times, the reduction in security vulnerabilities it prevents makes it a non-negotiable practice for any production-grade application.
Related posts
WebAuthn and FIDO2, Explained
An examination of WebAuthn and FIDO2 standards, covering attestation, user verification, and public key credentials for passwordless authentication.
Reactive Security: WebFlux & JwtAuthenticationToken
Explore WebFlux security patterns using ReactiveSecurityContextHolder and JwtAuthenticationToken for non-blocking authentication.
Migrating an Existing User Base to Passwordless
A practical guide to migrating an existing user base to passwordless authentication, covering enrollment strategies, user adoption, and rollout planning.