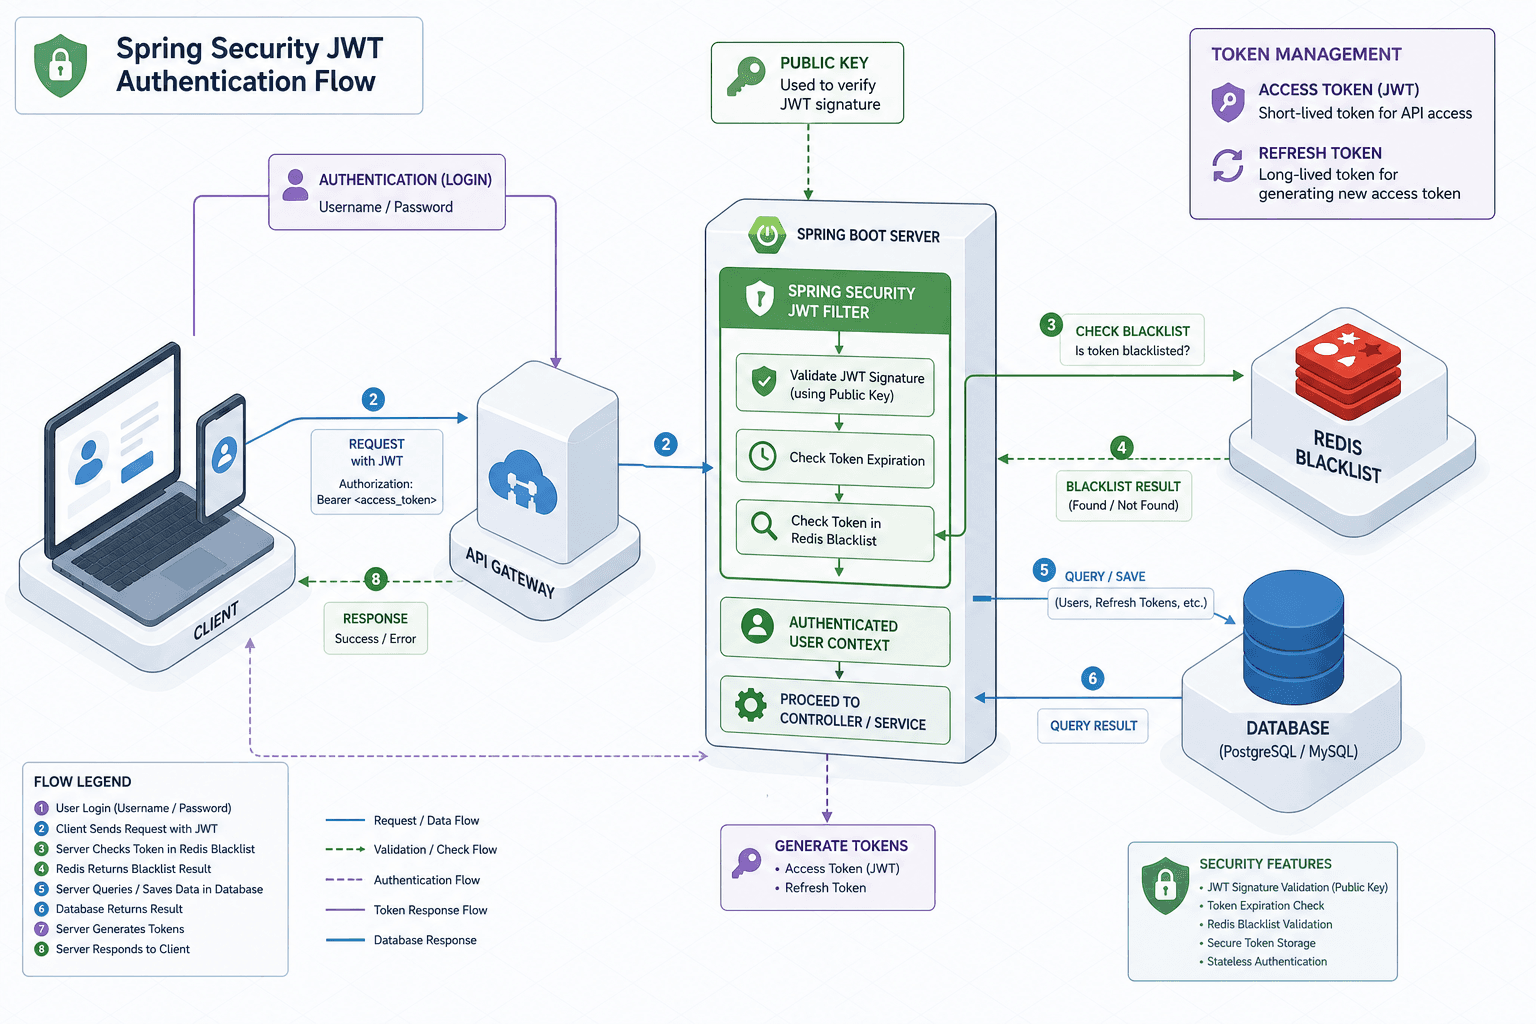
Spring Security with JWT: Complete Authentication Implementation
A complete guide to implementing Spring Security with JWT, covering authentication, refresh tokens, and JWT filtering strategies.
The fundamental shift in building stateless authentication with Spring Security is replacing the server-side HttpSession with a client-side token that carries its own claims. In a traditional session model, the server maintains a map of user IDs to session objects. With JWT, the server acts only as a validator. The mechanism relies on a cryptographic signature; if the token's signature does not match the secret key or public key known to the server, the token is rejected immediately. This means the server never needs to look up a session ID in a database for every request, but it must still handle the lifecycle of token validity, which introduces complexity regarding revocation and expiration.
As Part 3 of the Spring Security Deep Dive Series, this guide explores the practical implementation of this pattern, aligning with spring security configuration best practices.
The Filter Chain: Intercepting Stateless Requests
The entry point for this architecture is a custom OncePerRequestFilter. This filter sits within the Spring Security filter chain, typically before UsernamePasswordAuthenticationFilter or OAuth2AuthorizationRequestRedirectFilter. Its job is to extract the raw string from the Authorization: Bearer <token> header.
Consider a request arriving at /api/users/profile. The filter JwtAuthenticationFilter intercepts the request. It parses the header, validates that the token is present, and then delegates the heavy lifting to a JwtDecoder. If the token is malformed or missing, the filter throws an AuthenticationException, halting the chain. If the token is valid, the filter constructs an Authentication object, specifically a JwtAuthenticationToken, and sets it on the SecurityContextHolder.
public class JwtAuthenticationFilter extends OncePerRequestFilter {

    private final JwtDecoder jwtDecoder;
    private final AuthenticationEntryPoint authenticationEntryPoint;

    @Override
    protected void doFilterInternal(HttpServletRequest request,
                                    HttpServletResponse response,
                                    FilterChain filterChain)
                                    throws ServletException, IOException {

        String authHeader = request.getHeader("Authorization");

        if (authHeader == null || !authHeader.startsWith("Bearer ")) {
            filterChain.doFilter(request, response);
            return;
        }

        try {
            String token = authHeader.substring(7);
            // The decoder handles the cryptographic verification
            Jwt jwt = jwtDecoder.decode(token);
            JwtAuthenticationToken authentication = new JwtAuthenticationToken(jwt);

            SecurityContextHolder.getContext().setAuthentication(authentication);
        } catch (InvalidTokenException | ExpiredJwtException e) {
            authenticationEntryPoint.commence(request, response, e);
            return;
        }

        filterChain.doFilter(request, response);
    }
}
This mechanism ensures that every request is authenticated independently. The SecurityContextHolder acts as the bridge, allowing downstream components (like @PreAuthorize methods) to access the user's claims (e.g., jwt.getClaims().get("roles")) without any database lookups for the user's identity. This process is central to token validation in modern architectures.
Validation Mechanics: The Decoding Process
The core of the validation logic lies in the JwtDecoder. When using Spring Security 6+, the default implementation often relies on NimbusJwtDecoder. The decoder verifies two critical properties: the signature and the expiration.
For asymmetric algorithms like RS256, the server holds a private key used by the authentication service to sign tokens. The public key is distributed to all API servers. When the filter receives a token, the JwtDecoder uses the public key to decrypt the signature. If the decrypted hash matches the hash calculated from the payload, the token has not been tampered with.
@Bean
public JwtDecoder jwtDecoder(@Value("${security.jwt.public-key}") String publicKey) {
    NimbusJwtDecoder decoder = NimbusJwtDecoder.withJwkSource(
        JwksResource.fromUri(new URI(publicKey))
    ).build();
    return decoder;
}
This step is purely cryptographic. The server does not know if the user is "allowed" to access the resource at this stage; it only knows the token is valid and issued by a trusted source. Claims like exp (expiration time) are checked automatically by the JwtDecoder. If the current timestamp exceeds the exp claim, a ExpiredJwtException is thrown, and the filter chain stops.
The Refresh Token Strategy
A common misconception is that JWTs are self-contained and immutable, implying that once issued, they cannot be revoked until expiration. While true for the Access Token, a production system requires a mechanism to invalidate access before the token expires. The solution is the Refresh Token pattern.
The Access Token is short-lived (e.g., 15 minutes). The Refresh Token is a separate credential, often an opaque random string or a signed JWT, stored server-side in a database. It is distinct from the self-contained Access Token, which travels with every request.
When the Access Token expires, the client sends the Refresh Token to a dedicated endpoint, e.g., /api/auth/refresh. The server queries the database for this Refresh Token. If found and valid, the server issues a new Access Token. Crucially, the server can also rotate the Refresh Token. This means the old Refresh Token is deleted, and a new one is generated. To invalidate a stolen token, the server must rely on checking last_used timestamps or requiring a password change, rather than relying solely on login-triggered rotation.
Blacklisting and Revocation Mechanisms
Even with short-lived Access Tokens, there are scenarios where immediate revocation is necessary, such as a user changing their password or being banned. Since JWTs are stateless, you cannot simply "delete" them from the server. The mechanism here is a "Blacklist" or "Allowlist" check.
We introduce a secondary check in the JwtAuthenticationFilter or a dedicated TokenBlacklistFilter. Before accepting the token, the filter checks a fast key-value store like Redis. The key is the jti (JWT ID) or the token itself, and the value is the expiration timestamp.
If the token's jti exists in the Redis store, the filter rejects the request with a 401 Unauthorized, effectively blacklisting the token. This approach trades a small amount of network latency (Redis lookup) for security control.
// Conceptual logic within the filter
if (redisTemplate.hasKey("blacklist:" + jwt.getClaim("jti"))) {
    throw new InsufficientAuthenticationException("Token revoked");
}
When a user logs out, the application retrieves the jti from the current token and adds it to the Redis store with a TTL equal to the token's remaining lifetime. This ensures the blacklist entry automatically expires when the token naturally expires, preventing the store from growing indefinitely.
Common Pitfalls
Implementing JWT security introduces specific challenges that require careful handling:
- Redis Key Collision: Ensure the key format for blacklisting includes the tenant ID or user ID prefix to prevent collisions in multi-tenant environments where multiple users might share a
jtinamespace. - Clock Skew: Servers and clients may have slight time discrepancies. Configure the
JwtDecoderto allow a small grace period (e.g., ±30 seconds) fornbf(Not Before) andexpclaims to avoid rejecting valid tokens due to clock drift. - JWT Size Limits: Large claims or multiple groups in the payload can cause the JWT header to exceed browser or proxy size limits (often 8KB). Keep claims minimal and consider using external references for large datasets.
Practical Takeaways
- Minimize Payload: Keep JWT payloads small to avoid hitting transmission limits and to reduce the surface area for token manipulation.
- Rotate Frequently: Implement refresh token rotation to ensure that even if a token is intercepted, its window of utility is strictly limited.
- Externalize State: For immediate revocation, offload the blacklist state to a fast store like Redis rather than attempting to maintain state in the application memory.
FAQ
Q: Can I extend the expiration of an existing JWT? A: No, JWTs are immutable once signed. To extend validity, you must issue a new token using the Refresh Token flow.
Q: Where should Refresh Tokens be stored on the client? A: Store Refresh Tokens in secure, HttpOnly cookies to prevent XSS attacks, or in secure storage if using mobile/native apps. Avoid LocalStorage for Refresh Tokens.
Q: How does OAuth2 JWT differ from standard JWT authentication?
A: oauth2 jwt implementations often involve a resource server validating a token issued by an authorization server, whereas standard JWT auth might involve the application issuing its own tokens. The validation mechanism (JwtDecoder) remains similar, but the trust boundaries differ.
Configuration and Integration
Integrating this into Spring Boot requires configuring the SecurityFilterChain to order the custom filter correctly. The JwtAuthenticationFilter must run before the AuthorizationFilter (if using method-level security) to ensure the SecurityContext is populated.
@Bean
@Order(Ordered.HIGHEST_PRECEDENCE)
public SecurityFilterChain filterChain(HttpSecurity http,
                                       JwtAuthenticationFilter jwtAuthFilter)
                                       throws Exception {
    http
        .csrf(csrf -> csrf.disable())
        .authorizeHttpRequests(auth -> auth
            .requestMatchers("/api/auth/**").permitAll()
            .anyRequest().authenticated()
        )
        .addFilterBefore(jwtAuthFilter, UsernamePasswordAuthenticationFilter.class);

    return http.build();
}
This configuration ensures that every request, except those explicitly permitted (like login or refresh), passes through the JWT validation logic. The combination of cryptographic verification, short-lived access tokens, database-backed refresh tokens, and Redis-based blacklisting creates a secure, scalable authentication system that scales horizontally while maintaining strict security controls.
Conclusion
Implementing Spring Security with JWT requires a deliberate shift from stateful sessions to a stateless, cryptographic verification model. By leveraging OncePerRequestFilter for interception, JwtDecoder for validation, and external stores like Redis for blacklisting, developers can build secure, scalable authentication systems. The Refresh Token strategy further enhances security by allowing revocation before expiration, addressing the inherent limitations of stateless tokens.
Related posts
Implementing Passwordless MFA with FIDO2 and WebAuthn in Spring Boot
A technical walkthrough on integrating passwordless MFA using FIDO2 and WebAuthn within a Spring Boot application.
Securing Server-Sent Events with OAuth2 Authentication
An examination of securing server-sent events using OAuth2 authentication to ensure real-time data integrity.
Building a Self-Service Password Reset with Spring Boot and Keycloak
A walkthrough of implementing password recovery and self-service identity flows using Spring Boot and Keycloak required actions.